|
There are currently no product reviews.
 ;
Good quality for the scan, complete, but as usual for Tascam, not so comprehensive !
 ;
great manual readable & easy to downlaod to be recommanded
;
Very useful, not the best scan, but definitely readable !
;
Complete service manual, good quality scan, great buy !
;
Excellent manual, exactly what I needed! Fair price!
1
2
3
4
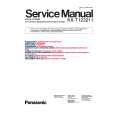
3 Note for attaching the LCD Assy
A
When tightening the six screws
1
6
, make sure that the VR
A
is at the center of the attaching hole.
5
1
4
B
6
3
2
C
A
The VR must be at the center of the attaching hole.
4 Note for attaching the LCD Assy to the panel stay
When tightening the six screws 1 from the holes on the panel stay.
D
6
, make sure that the positions of the two holes
B
of the LCD Assy will not be shifted
B 1 6 5 2
E
B
3
4
F
142
1 2
DJM-909
3 4
|