|
|
|
Categories
|
|
Information
|
|
Featured Product
|
|
|
 |
|
|
There are currently no product reviews.
 ;
Very happy to find this from owners-manual.com and the enclosed spec sheet as well.
Not longer available from Sony.
;
The Owner's manual was very helpful. The WEGA is about 35 years old and needed repair.
Your Website is pretty good und easily to handle.
Thank You
Carl-W. Lohmann
;
Perfect. Very good service and very good scanning quality. All sheets are very legible. Thank's
;
My first manual from Owner-Manuals.com but not the last! I am very satisfied with the easy ordering and promt delivery of a manual I did not find anywhere else.
 ;
This manual is very helpfull to use the Power Supply. All technical information has been available.
For service use the circuit diagrams are very good.
Thanks .
DLV-100
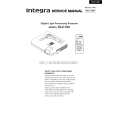
Remote Control Features
1. Infrared Transmitter Direct the remote control toward the remote sensor on the projector cabinet. 2. Standby/On Button If the main power is applied, you can use this button to turn your projector on or put it in standby.
Supplied Remote Control
1
5
3. S-Video Button Press this button to select an S-Video source from a VCR. 4. Video Button Press this button to select an NTSC, PAL, SECAM or NTSC4.43 compatible video source from a VCR, DVD player, laser disc player or document camera. 5. RGB Button Press this button to select a video source from computer or component equipment connected to your RGB port. 6. Auto Adjust Button Use this button to adjust an RGB source for an optimal picture. Some signals may not be displayed correctly or take time to switch between sources. 7. Magnify + - Buttons Use this button to adjust the image size up to 400%. To change the position of the magnified screen, press one of the LM buttons to recall the magnifying glass, then use the LM buttons to move the screen. 8. Volume + - Buttons Press + button to increase the volume and - button to decrease it. 9. ASPECT Button Press this button to select the screen size. 10. Mute Button This button turns off an image and sound for a short period of time. Press again to restore the image and sound. NOTE: When the menu is displayed, a press of this button mutes an image and sound without turning off the menu. 11. PICTURE Button Press this button to recall and display the screen-related menu. 12. Freeze Button This button will freeze a picture. Press again to resume motion. 13. Menu Button Displays the menu for various settings and adjustments. 14. LAMP RESET Button If the lamp has been turned on for more than 1,600 hours (Normal mode), the power to the unit will be cut off and no messages will be displayed. Press and hold down this button for 10 seconds or more while the unit is in stand-by mode to clear the lamp available time and the lamp usage time.
INPUT
2 3 4 8 9 10 14 15 16
6 7 11 12 13 17
15. LM (Select) Buttons L,M: Use these buttons to select the menu of the item you wish to adjust. , : Use these buttons to change the level of a selected menu item. A press of the button executes the selection. When the magnifying glass is displayed, these LM buttons move the magnifying glass. 16. Cancel Button Press this button to exit "Menus". Press this button to return to the previous menu without storing the current settings or adjustments when you are in the submenu or adjustment screen. 17. Enter Button Press this button to execute the selected item. When this is pressed, the adjustments and settings are saved, and the display is returned to the menu.
|
|
|
> |
|