|
|
|
Categories
|
|
Information
|
|
Featured Product
|
|
|
 |
|
|
There are currently no product reviews.
 ;
The service manual is as described and received the link to the download sooner than expected. Great service, quality product. This site is a big help in the electronics repair business.
;
Il service manual molto accurato. Rapidi nella risposta
;
Quick site processing. A complete and very useful manual with all details. Thank you!
;
Quick service response. A useful and very rare service manual with all details. I recomend this service.
;
I ordered this manual sometime in the afternoon and I received it on my e-mail the same evening.
This is a fantastically good and properly scanned copy of the original manual. All pages are of the same scale and they overlap each other. It means that you can print the manual and easily make it as a convenient paper manual.
The content of the manual is fantastic. Alignment descriptions, PCB layouts and elementary diagrams are explicit and precise. I immediately found what I was looking for. Thanks to this manual and Owner-Manuals.com my amplifier is alive again. Many thanx indded!
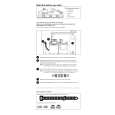
8.4.
Disassembly Procedure for the Lens
8.4.2.
Removal of the Decoration Ring
NOTE: When Disassembling and Assembling for the Lens 1. To minimize the possibility of the CCD being dirt, perform disassemble and/or assemble under the condition of the CCD is being mounted. Disassembling procedures for the CCD unit, refer to item 8.6. 2. Take care that the dust and dirt are not entered into the lens. In case of the dust is putted on the lens, blow off them by airbrush. 3. Do not touch the surface of lens. 4. Use lens cleaning KIT (BK)(VFK1900BK). 5. Apply the grease (VFK1829) to the point where is shown to" Grease apply" in the figure. When the grease is applied, use a toothpick and apply thinly.
8.4.1.
1. 2. 3. 4.
Removal of the Lens FPC Unit
Remove the solders (4 points). Remove the lock (8 points). Unscrew the 4 screws (A). Remove the Lens FPC unit.
8.4.3.
Removal of the Lens Ring Front and Zoom Ring Unit
32
|
|
|
> |
|