|
|
|
Categories
|
|
Information
|
|
Featured Product
|
|
|
 |
|
|
There are currently no product reviews.
 ;
Manual-link came 30 minutes after having paid for an extremely rare (40 years old) item (sony icr-120) and helped me to get the radio rework again. So really good help for me, fast and reliable delivery and -taken that into consideration- a very reasonable price for that service. So thanks again! Mike, Germany
 ;
Some of the pictures in this manual are a bit irritating. I had to dissassemble the unit and some of the screws have different threads, which is not mentioned in this manual. Also some of the drawings of the boards look different than the actual boards.
After all, the manual was very useful. I was able to recalibrate the capstan drive and it is working fine again.
;
This manual is very good. 303 pages scanned in a very high resolution. My camera has bad, leaking capacitors which all of the V5000 models are suffering from these days.
There is a huge part list with all capacitors, transistors etc. in this manual which helped me a lot. Otherwise I would not have been able to buy replacement parts.
The dissassembly guide is very enormous and detailed. Unlike on the Panasonic MS1 manual I downloaded here it actually looks like the real parts look. And the screws are labeled correctly, so you shouldn't have any left after the repair. ;)
;
has all the schematics you could need,and very well laid out format also has all part numbers along with an exploded view which is helpful
;
Very nice to have! Now it is no problem to understand how it is put together.
Helps me a lot.
5.4
Updating the firmware of the drive unit
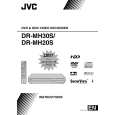
� Firmware update disc supports only DVD-RAM media. � When firmware update is necessary, written discs are distributed by DIGITAL VIDEO STORAGE CATEGORY, CS group. (1) Turn the main body ON. (2) Load the update DVD-RAM disc on the tray and close the tray. (3) �READING� is displayed in the FL indicator and the update is started. (4) In a short while �READING� in the FL indicator disappears, open the tray to remove the disc and close the tray. (5) Turn the power OFF and pull out the power code from the wall socket, then plug the power cord into the wall socket again. (6) Set to the JIG mode and check the firmware version of the drive. 5.5 Taking out a disc <Method 1 > There is a forced tray eject mode with electrical operation. (1) Right after plugging in the power code (while �LOADING� is displayed), keep pressing the OPEN/CLOSE button of the main body. (2) Remove the disc as the tray is ejected in a short while. (3) Make sure to close the tray afterwards. <Method 2 > When the disc cannot be removed by operating above <Method 1 >, open the front door of the main body manually and directly press the EJECT button located in the lower right of the drive unit. <Method 3 > When neither <Method 1> nor <Method 2> can remove the disc, the tray can be ejected mechanically without turning the power on. (1) Open the front door of the main body manually. (2) Insert a fine wire (e.g. a straightened paper clip) into the hole in the lower part of the tray of the drive unit. (3) As the tray ejects a little, pull out the tray manually.
Front door
Tray
Hole EJECT Button
5.6 Exchanging the fitting As the fitting that comes with the service drive unit cannot be used, make sure to attach a service fitting when the drive unit is exchanged. The fitting that is removed from the old drive unit can be attached to the new drive unit. The fitting can be removed by pulling upwards while opening out the lower part of the fitting outwards.
Tray
Fitting
1-16 (No.YD027)
|
|
|
> |
|