|
|
|
Categories
|
|
Information
|
|
Featured Product
|
|
|
 |
|
|
There are currently no product reviews.
 ;
Was happy to find the complete owners manual... It's all in there, just like the original...
;
Thanks for offering this item at such a good price. Proved handy in identifying the part I was looking for my set.
;
Thr Video Recorder i have is quiet Old and the Producer could Not help me. So i w as very glad to find an offer for the owners Manual for a very fair Price.a I obtained the original Manual very quick and I am happy to have it now.
 ;
The PDF copy was immediately available on download after the payment. However, I noticed that the document was in German, and Ihad to contact a German translator to get it translated it to English. The quality of document is legible can be used for my purpose.
;
The manual was complete and of great quality. Originally a tri-lingual file, I first received only one language. After a note to owners-manuals.com, I quickly received the remaining languages... Great service, definitely worth it.
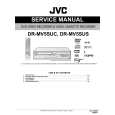
ADVANCED RECORDING
EN
61
Watch Another Program While Recording On The Unit
While recording is going on, you can watch another program on the TV by using the TV�s tuner. NOTE:
It is required that the remote control is set to be able to operate the TV in advance. ( pg. 70)
Tape Remaining Time
1 Press DISPLAY until the time remaining on the tape appears.
� By pressing the DISPLAY button, you can change display to show the clock time, counter reading or tape remaining time.
NOTE:
Depending on the type of tape being used, the tape remaining time reading may not appear right away, or is not correct. �� �:� �� may sometimes appear, or the display may blink on occasion.
1 During recording, press TV INPUT to switch the TV�s input
mode so that the program selected on the TV appears.
2 Slide the TV/DVD switch to TV. 3 Press CH +/� repeatedly to select the desired channel.
Second Audio Recording
This unit�s built-in MTS decoder enables reception of Multichannel TV Sound broadcast. To record a SAP program received, set �2ND AUDIO RECORD� to �ON�. ( pg. 73) NOTE:
When the channel is changed on the unit; � The �ST� appears on the front display panel for about 5 seconds if the program is a stereo broadcast. � The �SAP� appears on the front display panel for about 5 seconds if the program is a SAP broadcast. � Both appear when a stereo program is accompanied by SAP sound.
Instant Timer Recording (ITR)
This easy method lets you record for from 30 minutes to 6 hours (selectable in 30-minutes interval), and shuts the unit off after recording is finished.
1 Press 7 on the unit to start recording. 2 Press 7 again to engage the ITR mode.
� On the front display panel, �0:30� appears.
3 If you want to record for more than 30 minutes, press 7 to extend the time. Each press extends recording time by 30 minutes. NOTES: � You can only perform ITR using the 7 button on the unit.
� When the end of the tape is reached during timer recording or Instant Timer Recording, the cassette is automatically ejected and the unit is shut off. � During Instant Timer Recording, any other timer programed recording won�t start even if their start time has come. In such a case, the timer programed recording starts (if the end time of the timer programed recording is set after the end of Instant Timer Recording) after the Instant Timer Recording finishes.
Active Video Calibration
The Video Calibration checks the condition of the tape in use during playback and recording, and compensates to provide the highest-possible playback and recording pictures. You can set �VIDEO CALIBRATION� to �ON� or �OFF� to your preference. ( pg. 75) Playback The unit assesses the quality of the tape once you initiate playback.
� The Video Calibration is active during automatic tracking.
Elapsed Recording Time Indication
1 Press DISPLAY until a counter reading appears on the front
display panel.
� The unit adjusts the playback picture quality based on the quality of the tape in use.
2 Press C.RESET to reset the counter before starting recording or
� The counter is reset to �0:00:00� and shows the exact elapsed time as the tape runs. You can check the exact time of a recording or playback.
Recording The unit assesses the quality of the tape once you initiate recording.
� The unit spends approximately 7 seconds assessing the condition of the tape, then begins recording.
playback.
ATTENTION: Since the Video Calibration works before recording actually starts, there is a delay of approximately 7 seconds after 7 and 4 on the remote control are pressed, or 7 on the unit is pressed. To make sure you record the desired scene or program in its entirety, first perform the following steps: A Press and hold 9 and press 7 to engage the Record Pause mode.
� The unit then automatically checks the condition of the tape and, after approximately 7 seconds, re-enters Record Pause mode.
B Press 4 to start recording. If you want to bypass the Video Calibration and begin recording immediately, set �VIDEO CALIBRATION� to �OFF�. ( pg. 75)
|
|
|
> |
|