|
There are currently no product reviews.
 ;
Manual was destroyed and this purchase made it possible to recover my manual . It was easy to down load and smooth to use thanks .
 ;
Turns out this was not the manual i was looking for. The concertmate 670 keyboard i have is a "Realistic" model made for Radio Shack and none of the diagrams on the owners manual i received matches up. HOWEVER, I must say the service Owners Manual provides was fast and efficient by being available online. The manual was in good readable condition and easily downloaded.
;
Great price, Quick delivery, the document was very usefull A+++++++++++++++
;
Thank´s for your help, I already recived these manual from you
;
Thank you for your manual It has the basic things to and i use the Oszi for Longer Time.
THX
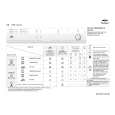
W�RMETAUSCHER
Vor Säuberung oder Wartung den Trockner ausschalten. Wärmetauscher mindestens vierteljährlich wie folgt reinigen: 1. Tür öffnen und die Taste für die Wärmetauscherklappe am unteren Rand der Einfüllöffnung drücken. 2. Die Wärmetauscherklappe springt auf. 3. Den Griff des Wärmetauschers nach oben in die waagerechte Position klappen und den Wärmetauscher herausziehen. 4. Wärmetauscher unter flie�endem Wasser reinigen. 5. Staub und Flusen an den Dichtungen und am Wärmetauschergehäuse mit einem feuchten Tuch abwischen. 6. Flusen aus dem Wärmetauschergehäuse entfernen. Die Abflussöffnung (Gehäusefrontseite links) flusenfrei halten. 7. Wärmetauscher wieder einschieben und den Griff nach unten drücken; dabei die Kennzeichnung OBEN beachten. 8. Klappe schlie�en. Die Aluminiumplatten des Wärmetauschers können sich im Laufe der Zeit verfärben.
1 2
3
4
8
|