|
|
|
Categories
|
|
Information
|
|
Featured Product
|
|
|
 |
|
|
There are currently no product reviews.
 ;
This manual is very useful. Because pioneer sx-q180 is unhandy to use without manual.
;
Manual was destroyed and this purchase made it possible to recover my manual . It was easy to down load and smooth to use thanks .
 ;
Turns out this was not the manual i was looking for. The concertmate 670 keyboard i have is a "Realistic" model made for Radio Shack and none of the diagrams on the owners manual i received matches up. HOWEVER, I must say the service Owners Manual provides was fast and efficient by being available online. The manual was in good readable condition and easily downloaded.
;
Great price, Quick delivery, the document was very usefull A+++++++++++++++
;
Thank´s for your help, I already recived these manual from you
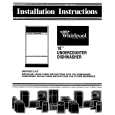
Drying Option Selects 3r Switcl h
Before starting
your dishwasher
3. Run hot water at sink nearest dishwasher until it is hot, then turn it off. 4. If you have a disposal in the sink, run it to clear any food scraps, then turn it off. This will insure good drainage.
1. Spin the Lower Spray Arm to make sure nothing will stop it from turning freely 2. Be sure nothing blocks the center area in the bottom rack. The center wash tower extends through this area during the cycle.
Starting
your dishwasher
A . ,,GH. Wb� 9)
NORMAL WASH Cycle...
1. Select a drying option. 2. Turn the Cycle Control Knob so that it points to NORMAL WASH. 3. Latch the door to start the cycle.
LIGHT WASH Cycle...
1. Select a drying option. 2. Turn Cycle Control Knob until it points to LIGHT WASH. 3. Latch the door to start the cycle.
RINSE & HOLD Cycle...
1. Select AIR DRY Option only. 2. Turn the Cycle Control Knob clockwise until it points to RINSE & HOLD. 3. Latch the door to start the cycle.
Changing a setting
You can change a setting anytime during any cycle. 1. Unlatch the door to stop the cycle. 2. Turn the Cycle Control Knob clockwise to the cycle you want. 3. Be sure the detergent dispensers properly for the new cycle. 4. Latch the door to start the cycle. are filled
|
|
|
> |
|