|
|
|
Categories
|
|
Information
|
|
Featured Product
|
|
|
 |
|
|
There are currently no product reviews.
 ;
Absolutely perfect! I've been trying to understand how to use all or at least some of the features of the receiver and especially the remote.
;
Copy of genuine owners/operators manual, very useful
;
The manual was a perfect match and was exactly what I was looking for. I'm very satisfied with my purchase.
;
Thank you for having the manual I needed for an older model Aiwa stero I had found on Ebay --- I wanted the Aiwa because I had tapes and cd's but I did not have a manual as to how to operate the system... I found what I needed and it has enabled me to set the system up for my enjoyment.
;
I wished detailed information of the JBL S310 and here I found it! Very happy with the service from this site!
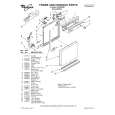
Mixed
l
load
Do not cover third level wash
Load plastic items in the top rack only. Only plastic items marked �dishwasher safe� are recommended. Load plastic items so the force of the spray does not move them during the cycle. Plastic items can be melted in the bottom rack.
l
l
Utensil
load
Mixed load
. Small howls, pans and other utensils can be placed in the top rack.
Adjustable
.
3-position
I
top
rack
(on some models~
You can raise or lower the rack to fit tall items in either the top or bottom rack. The high and bw positions are marked on the adjuster on the side facing the center of the dishwasher. 1. Hold the top rack with one hand near the adjuster. 2. Pull the top of the adjuster lever out with the other hand. 3. Lift or lower the rack to one of the preset positions. 4. Release the adjuster lever. 5. Repeat Steps l-4 for the three remaining adjusters as needed. The four adjusters can he raised or lowered separately or together, as desired. The top rack does not have to be level.
16
|
|
|
> |
|