|
|
|
Categories
|
|
Information
|
|
Featured Product
|
|
|
 |
|
|
There are currently no product reviews.
 ;
Received a quick response, material was exactly what it was supposed to be. The service did everything I expected it to do. would use service again.
;
Detailed SONY CFD980 Service Manual at an easy to find one stop shopping. Make my radio hobby technically interesting. Thanks.
 ;
Excellent service from Owner-Manuals.com, good prices and quick turn around. The supplied PDF was good enough quality to be enlarged sufficiently to read component values.
;
Very complete shop manual. It contains everything needed to troubleshoot bascially any problem. Instructions, diagrams, schmeatics, illustrations... it's all there. Highly recommended!
;
Great product, very good quality, found all needed information. Thanks
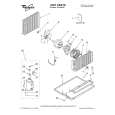
8. PURITY / CONVERGENCE ADJUSTMENT
PURITY ADJUSTMENT
1. 2. 3. 4. 5. 6. 7. Demagnetize CRT with the demagnetizer. Loosen the retainer screw of the deflection yoke. Remove the wedges. Input a green raster signal from the signal generator, and turn the screen to green raster. Move the deflection yoke backward. Bring the long lug of the purity magnets on the short lug and position them horizontally. (Fig2) Adjust the gap between two lugs so that the GREEN RASTER will come into the centre of the screen. (Fig. 3) Move the deflection yoke forward, and fix the position of the deflection yoke so that the whole screen will become green. Insert the wedge to the top side of the deflection yoke so that it will not move.
Long lug WEDGE DEFLECTION YOKE
P
CRT
46
P/C MAGNETS P: PURITY MAGNET 4: 4-POLES (convergence magnets) 6: 6-POLES (convergence magnets)
8.
Fig. 1
PURITY MAGNETS
9.
10. Input a crosshatch signal. 11. Verify that the screen is horizontal.
12. Input red and blue raster signals, and make sure that
purity is properly adjusted.
Short lug
Bring the long lug over the short lug and position them horizontally.
Fig. 2
(FRONT VIEW) GREEN RASTER
CENTER
Fig. 3
11
|
|
|
> |
|