|
|
|
Categories
|
|
Information
|
|
Featured Product
|
|
|
 |
|
|
There are currently no product reviews.
 ;
Perfect copy of the service manual. you can enlarge every page, and it comes up
with all details.
;
It´s very very nice manual with all, what i need. Original in good quality. Very fast business. Very much thanks...
;
Purchased the manual that I was looking for at a great price and could download it easily.. Great service experience and for future purchases I plan to use the site.
Thank you very much
;
Exactly what was needed to assess the product - excellent value and great service
;
A site where discontinualed schematic diagrams and back dated information can be found on discontinued radios tv's and any electronic equipment can be found. Newer manuals either Service and operating manuals. Radio amateurs should find this site a great source for ham radio equipment manuals. I will return to this site should I need information on any electrical equipment. priced easy to download in a PDF format and print pages need to undertake the repair.
DV-533, DV-3310, DV-533K, DV-5310KD
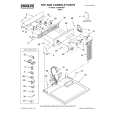
Disassembly of the Traverse Mechanism Assy and the Pickup Assy 1 2 3 4 5 6
Remove the Bonnet and Tray Panel. Remove the Front Panel. Remove the Bridge (Screw �1). Pull out the Tray and remove it while unhooking a Hook. Turn the Short SW to Short side. Remove three connectors.
7 8
Remove the Loading Mechanism Assy (Screws �4). Remove a screw.
Cautions:
Screw is locked with Silicone Adhesive. Please lock it with Silicone Adhesive when installs it. Remove the FFC Holder with the state which Flexible Cable was atatched. 8 Silicone Adhesive GEM1037 Traverse Mechanism Assy
9
4
-1
Hook Bridge
9 3
-2 -1
3
6 6
6
FFC Holder
4
-2 DVDM Assy Bottom View
RearView
Pickup Assy
Short
Open
5
Short SW
When Removing The Traverse Mechanism Assy
Caution in the tray insertion
In the Tray insertion, insert it after matching a triangle mark of the Loading Base and a position of pin of the Drive Cam. Triangle mark Loading Base
10 11 12
Remove the Pickup Flexible Cable Unhook ( �4) Remove the Traverse Mechanism Assy
Traverse Mechanism Assy
DVDM Assy Side
11 � 2
12
10
11 � 2
Traverse Mechanism Assy
Pin
Drive Cam
Exchange
73
|
|
|
> |
|