|
There are currently no product reviews.
 ;
High quality scan of original Service Manual. Everything´s fine!
 ;
Good scan of the original service manual. All schematics and adjustment procedures are there. It helped me to fix a long lasting problem with the tracking circuitry. The manual also includes the supplementals 1,2 and 3. Included are; electrical schematic's , pcb layout's, mechanical drawing's and exploded views, disassembly manual and maintenance procedures. 236 pages.
;
The Service Manual received was helpful. The electronic information is exactly what I needed.
I recomend all of my friends about this technical page.
;
High quality scan of service manual. I am satisfied!
;
Excellent copies.
I will use "Owner Manual" again a second time.
5
6
7
8
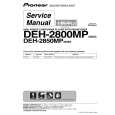
6.5 MECHANISM ADJUSTMENT
A
1 Tangential and Radial Height Coarse Adjustment START
� Remove the servo mechanism. � Remove a Spacer for height adjustment attached to the back side (shaded area) of the Servo Mechanism (Float Base) with nippers.
B
Servo Mechanism
Cautions: Because there is not a Spacer for height adjustment in adjustment after the second time, will keep it at need. (This parts is Traverse mechanism exclusive use of a model for 2001 years)
Float Base
7.3mm
C
Spacer for Height adjustment
Note: Turn the Short switch to Short side when removing the Pickup Flexible Cable. (Refer to "7.1.6 DISASSEBLY".)
Put a spacer between a Tangential (or Radial) adjustment screw and Mechanism Base and turn each screw to adjust the height. (Refer to "6.1 ADJUSTMENT ITEMS AND LOCATION".)
Turn a flat side into bottom
D
E
F
DV-C505
5 6 7 8
47
|