|
|
|
Categories
|
|
Information
|
|
Featured Product
|
|
|
 |
|
|
There are currently no product reviews.
 ;
manual de usuario perfecto y completo de buena calidad de impresion y muy detallado ideal !
 ;
It`s full copy of a service manual from url http://www.philips.owner-manuals.com/PM3216-service-manual-PHILIPS.html
;
perfect! you just sent to me the copy in Italian witout even my specification!!!! so you are really smart cooperative and efficient. To my opinion the best place all over to get a manual of electronics!!!!
;
Well Well Well!!!! Good manual perfect for my hobby!!! As Before you have done a very well done work!!!! Thank you
;
Super nice! Good to have a manual in digital format.
Hookups (cont�d) 13
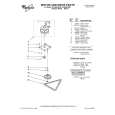
Connecting to a TV and a two-channel Stereo (Stereo has Dolby Pro Logic or right/left Audio In jacks)
2
Stereo (example only)
Back of TV (example only)
VIDEO IN
3
RIGHT AUDIO IN VIDEO IN LEFT AUDIO IN
Y
1
Pb
Pr
VIDEO OUT
1 2 3 4 5
Connect the supplied video cable to the yellow VIDEO (VIDEO OUT) jack of the Player and to the TV�s VIDEO IN jack. The supplied video cable has yellow ends. Connect the supplied audio cable to the red and white AUDIO OUT (right and left) jacks on the Player and to the right/left AUDIO IN jacks on the Stereo. The supplied audio cable has red and white ends. Match the cable colors to the jack colors. The red jack is the Right audio channel and the white jack is the Left audio channel. Plug the power cords of the Player, Stereo, and the TV into an active power outlet. Press down POWER ON/OFF on the front of the Player to turn on the Player. Turn on the Stereo power and set your Stereo to the correct Audio In channel or sound source. Refer to the Stereo owner�s manual for details. Turn on the TV power. Set the TV to the correct Video In channel. See your TV owner�s manual for details. Or, change channels at the TV until you see the blue Philips DVD background screen or the Player�s screen saver on the TV.
Helpful Hint
� If you prefer or need to use the S-VIDEO or Y Pb Pr jacks instead, see pages 11-12. You only need one video connection between the TV and the Player.
|
|
|
> |
|