|
|
|
Categories
|
|
Information
|
|
Featured Product
|
|
|
 |
|
|
There are currently no product reviews.
 ;
Helpd me mont a new carradio when prewius mont was a mess.
;
Very good service and quick service, very good quality of service manual!
;
Great tape deck manual!
I'm very positively surprised, because it is a very long manual, lot of pages, drawings, diagrams, description of how to make the alignment and adjustment procedures.
It is as good as the old "Naka" manuals from the 1970's - if somebody have seen them, they know what I mean by that.
I recommend to buy this very much !
;
I am a vintage hifi collector. No way to fix that device without the appropriate service manual...thanks to your site I got it and every thing is easier now. I got the manual right after ordering: fast cheap accurate ... thank you
;
Wonderful job clear. Qick fantastic. These people are really good. If even a problem arise they are wonderful assisting you. These scheme is so net despite this is a very old TV. Thank you for everything!!!!!!!!
DV-L70S DV-L70BL DV-L70W
5. DISASSEMBLY METHOD
5-1. DISASSEMBLY METHOD
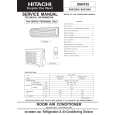
1. Remove the nine screws 1. 2. Loosen the two screws 2. 3. After opening the LCD unit, remove the hinge claw of cabinet A to detach it from cabinet B. Note: The power SW button is also removed. Be careful not to forget it when assembling the unit. 4. Remove the FFC A from the main PWB.
1
2
A
Power SW Button
5. Remove the screws 3. Note: Check the screws before assembling because they are different depending on the right and left hinges. 6. Remove the connector 4 from the main PWB. 7. Remove the pickup FPC/sled lead connector 5. 8. Remove the screws 6 fixing the DC jack PWB.
5
5 6
4 3
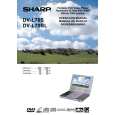
9. Remove the four LCD rubber caps 7. 10. Remove the four screws 8. Note: Be careful not to forget to put space washers when assembling because they are tightened with the above screws. 11. Remove the cabinet D. At this time, remove engagement claws (two on the upper LCD panel, two on the right and left sides, two on the lower LCD panel). Note: Do not break the claws on the right and left sides by opening cabinet C a little. 12. Remove the right and left speaker connectors 9.
8
7
Space Washer
7 8
Space Washer 9
10
13. Remove the screw 0. 14. Remove the FPC q from the connector. 15. Remove the screw w. 16. Remove the FPC e from the connector. 17. Remove the screw r. 18. Remove the connector t.
11 14 11
13
12
15
19. Remove the four screws y. 20. Remove the three claws on the control panel (front: 2 pcs., rear: 1 pc.). 21. Open the disc cover u 180� to remove it from cabinet A.
17
16
7
 $4.99 DVL70S SHARP
Owner's Manual Complete owner's manual in digital format. The manual will be available for download as PDF file aft… 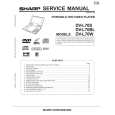 $4.99 DV-L70S SHARP
Parts Catalog Parts Catalog only. It's available in PDF format. Useful, if Your equipment is broken and You need t…
|
|
|
> |
|