|
|
|
Categories
|
|
Information
|
|
Featured Product
|
|
|
 |
|
|
There are currently no product reviews.
 ;
Product was very good. Received quickly and complete
 ;
Although printing quality is not the best, the manual was very helpful in order to reactivate this ancient but still good electronic musical instrument.
;
as a first-time user and buyer from this site, i found the overall service outstanding!! this product is a godsend as, without it, i would never have been able to find my way around and use my machine as intended. i will certainly use this site again as required. many many thanx!!
;
This manual is exactly what I needed. This site always has every manual I need, and it is also much less expensive then most other sites. This is the only manual site I will use.
;
Useful manual, good scan, worth the pay if you find the unit difficult to operate.
INSTALLATION
1 Turn off the power of the personal computer and remove the power cord from the AC outlet, then remove the cover or the front panel. 2 Remove the blank panel installed on the front of the 5.25 inch slot. 3 Install the fixing slide rails on the drive. (When slide rails are required, please contact your shop or the computer manufacturer.) 4 Insert the drive into the slot. 5 When fixing is required, please refer to the instruction manual for the computer. ÷ Please use screws with a length of 5 mm (3/16 in.) or less for mounting. Using longer screws may cause damage on the drive. ÷ When the mounting screws are loose etc., the vibrations from disc rotation may generate ripping noise, to prevent it the screws should be tightened securely.
���
1 å�³æ��计ç®�æ�ºç��ç�µæº�ä¾�åº�å�¨å¹¶ç§»å¼�ç��å�æ��å��æ�¹é�¢æ�¿ã�� 2 移å¼�å®�è£�å�¨ï¼�ï¼�ï¼�ï¼�â��å�£å��ç��空ç�½é�¢æ�¿ã�� 3 å�¨é©±å�¨å�¨ä¸�å®�è£�å�ºå®�æ»�轨ã��ï¼�é��è¦�æ»�轨请ä¸�åº�家æ��计ç®�æ�ºå�¶ é� å��è��ç»�ï¼�ã�� 4 å°�驱å�¨å�¨æ��å�¥å�¡å�£ã�� 5 é��è¦�å�ºå®�æ�¶ï¼�请å��è��个人计ç®�æ�ºç��æ��ä½�æ��å��ã�� ÷ 请使ç�¨é�¿åº¦ï¼� mmï¼�ï¼�ï¼�ï¼�ï¼�â��ï¼�ã��以ä¸�ç��è�ºä¸�é��å®�è£�ã��使ç�¨å¤ªé�¿ç�� ÷ è�ºä¸�é��å�¯è�½ä¼�é� æ��å��驱å�¨ç��æ��å��ã�� å½�å®�è£�ç��è�ºä¸�é��æ�¾å�¨æ�¶ï¼�ç��ç��æ��转æ�¶ç��æ�¯å�¨å�¯è�½ä¼�产ç��æ��大 ç��å�ªé�³ï¼�为äº�é�¿å��è¿�ç§�ç�¶å�µå��ç��请é��ç´§è�ºä¸�é��ã��
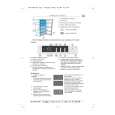
CONNECTIONS
÷ Turn off the power supply of the personal computer. ÷ Connect the power cable from the personal computer. At the time of connection, pay attention to the polarity of the cable. ÷ Connect the IDE interface cable. At this time, confirm that pin 1 of the IDE connector of the drive is connected correctly to pin 1 of the cable. ÷ When a sound card is being used, connect the audio output with an audio cable to the sound card. Be sure to supply electrical power for this product from the personal computer which is connected to it. Do not use any other power supply than the internal one of the personal computer. ÷ ÷ ÷ ÷
������
å®�è£�å��å�³æ��ç³»ç»�å��ç�¸è¿�硬设å¤�ç��ç�µæº�ã�� ä»�计ç®�æ�ºè¿�æ�¥ç�µæº�ç�µç¼�ã��è¿�æ�¥æ�¶ï¼�请注æ��ç�µç¼�ç��æ��æ�§ã�� è¿�æ�¥ï¼©ï¼¤ï¼¥æ�¥å�£ç�µç¼�ã��æ¤æ�¶ï¼�ç¡®å®�å��驱å�¨ä¸�ç��IDEè¿�æ�¥å�¨ï½�ï½�ï½�ã��ï¼� è¿�æ�¥è�³ç�µç¼�ç��ï½�ï½�ï½�ã��ï¼�ã�� å½�使ç�¨å£°å�¡æ�¶ï¼�å°�æ��é�³é¢�è¾�å�ºç��é�³é¢�ç�µç¼�è¿�æ�¥è�³å£°å�¡ã��
请确�����计������计�����产��请� 使�计����以�������
Pin 1 P���� Audio Cable ����
DC INPUT
1 2 5V G G 12V
IDE Interface cable IDE����
Power cable ����
�7�
|
|
|
> |
|