|
|
|
Categories
|
|
Information
|
|
Featured Product
|
|
|
 |
|
|
There are currently no product reviews.
 ;
Awesome quality manual. You really saved my bacon with this one. Was looking for some specific information with regards to my "new" vintage VCR that didn't come with the owners manual. This site is truely a goldmine of available manuals. The quality of the scans are top notch.
Thank-you so much for this awesome manual. If you're looking for this Sony SL-HF400 owners manual, this is the one you NEED to buy. Definitely worth the money.
;
The manual was made available promptly. I is a clean scan of the original. I had no problem downloading it. The scan was well centered and cleanly formatted. It is as good a product as can be had without being the original document.
 ;
Received downlink in less then 8 hours, Item was in good copy condition, and told me how to program the clock timer. The price was very resonable, and the process was very automated and was GREAT to work with.
;
Fast service, document is OK. Thanks! Searched for it long time.
;
I was very pleased with the manual I got for my amateur (ham) radio. Without it I could not figure out how to input and/or change the P/L setting on my radio. It drove me nuts as the radio was essentially useless. That all changed when my manual came. Then it took only minutes and I was done. Now my radio works fine. This is an exceptionally good resource as it's a very easy and user friendly download. Thank you very much! Dziękujemy za!
��
1 å�³æ��计ç®�æ�ºç��ç�µæº�ä¾�åº�å�¨å¹¶ç§»å¼�ç��å�æ��å��æ�¹é�¢æ�¿ã�� 2 移å¼�å®�è£�å�¨ï¼�ï¼�ï¼�ï¼�â��å�£å��ç��空ç�½é�¢æ�¿ã�� 3 4 5 ÷ å�¨é©±å�¨å�¨ä¸�å®�è£�å�ºå®�æ»�轨ã��ï¼�é��è¦�æ»�轨请ä¸�åº�家æ��计ç®�æ�ºå�¶é� å��è��ç»�ï¼�ã�� å°�驱å�¨å�¨æ��å�¥å�¡å�£ã�� é��è¦�å�ºå®�æ�¶ï¼�请å��è��个人计ç®�æ�ºç��æ��ä½�æ��å��ã�� 请使ç�¨é�¿åº¦ï¼�ã��ï½�ï½�ï¼�ï¼�ï¼�ï¼�ï¼�â��ï¼�ã��以ä¸�ç��è�ºä¸�é��å®�è£�ã��使ç�¨å¤ªé�¿ç��è�ºä¸�é��å�¯è�½ä¼�é�
INSTALLATION
1 Turn off the power of the personal computer and remove the power cord from the AC outlet, then remove the cover or the front panel. 2 Remove the blank panel installed on the front of the 5.25 inch slot. 3 Install the fixing slide rails on the drive. (When slide rails are required, please contact your shop or the computer manufacturer.) 4 Insert the drive into the slot. 5 When fixing is required, please refer to the instruction manual for the computer. ÷ Please use screws with a length of 5 mm (3/16 in.) or less for mounting. Using longer screws may cause damage on the drive. ÷ When the mounting screws are loose etc., the vibrations from disc rotation may generate ripping noise. To prevent it the screws should be tightened securely.
��驱����� ÷ ��������������转�������产��大����为��� ������请�紧����
��
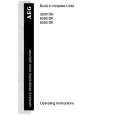
CONNECTIONS
P���� ���� Audio Cable
Pin 1
IDE����
����
IDE Interface cable 80-wire cable is required for maximum DVD writing speed.
Power cable
为达DVDæ��ä½³å�»å½�é��度ï¼�请使ç�¨ï¼�ï¼�çº¿ä¼ è¾�线 ï¼�å�³ï¼¤ï¼ï¼¡ï¼�ï¼�ã��æ�°æ�®çº¿ï¼�
÷ å®�è£�å��å�³æ��ç³»ç»�å��ç�¸è¿�硬设å¤�ç��ç�µæº�ã�� ÷ ä»�计ç®�æ�ºè¿�æ�¥ç�µæº�ç�µç¼�ã��è¿�æ�¥æ�¶ï¼�请注æ��ç�µç¼�ç��æ��æ�§ã�� ÷ è¿�æ�¥ï¼©ï¼¤ï¼¥æ�¥å�£ç�µç¼�ã��æ¤æ�¶ï¼�ç¡®å®�å��驱å�¨ä¸�ç��IDEè¿�æ�¥å�¨ã��ï½�ï½�ï½�ã��ï¼�è¿�æ�¥è�³ç�µç¼�ç�� ï½�ï½�ï½�ã��ï¼�ã�� ÷ å½�使ç�¨å£°å�¡æ�¶ï¼�å°�æ��é�³é¢�è¾�å�ºç��é�³é¢�ç�µç¼�è¿�æ�¥è�³å£°å�¡ã��
请确�����计������计�����产��请�使�计����以���� ���
÷ Turn off the power supply of the personal computer. ÷ Connect the power cable from the personal computer. At the time of connection, pay attention to the polarity of the cable. ÷ Connect the IDE interface cable. At this time, confirm that pin 1 of the IDE connector of the drive is connected correctly to pin 1 of the cable. ÷ When a sound card is being used, connect the audio output with an audio cable to the sound card. Be sure to supply electrical power for this product from the personal computer which is connected to it. Do not use any other power supply than the internal one of the personal computer.
-7-
-7-
|
|
|
> |
|