|
|
|
Categories
|
|
Information
|
|
Featured Product
|
|
|
 |
|
|
There are currently no product reviews.
 ;
Fast delivery and good quality copy. To be recommended
;
Excellent product, very clear print. Detailed circuit and assembly diagrams - this enabled me to repair my CD player with confidence. I highly recommend this site.
;
Fast access, 100% correct and complete service manual
;
just what i was seeking .had a password issue but the review allowed me to circumvent and download was great
;
Great manual, great price. Has a few of the basic operating instructions that most service manuals leave out. Complete instructions for disassembling board by board, safety precautions, schematics, complete parts list.
1
2
3
4
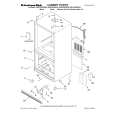
2. SERIAL DOWNLOAD
[Purposes]
A
1. When the main board is replaced, the firmware versions for the system control computer, drive, and the TUFL microcomputer do not match, and operations of the unit may be destabilized. In such a case, the versions for the above three must be matched. 2. This method is used when disc downloading fails.
[Tools to be used]
� PC with serial port � RS-232C cross cable � RS-232C I/F jig (GGF1348) � 7P FFC (VDA1681) � Download program (Image Updater) (*) � Firmware (*) This program must be installed in advance.
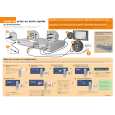
[Connection]
Connect as follows:
PC
RS-232C cable
RS-232C I/F
7P FFC
This unit
B
[Install Procedures of the Download Program]
1 Expand the compressed data of SLoader zip. 2 The folder of Image Tools is created, and then double-click on Setup. Exe of that file.
C
3 When the selection screen of the driver is appeared, search from C drive as the driver is installed by default for windows 2000/XP.) 4 When the installation is finished, confirm that the Image Updater can select as [start] [Program] [EMMA2RL Turnkey Image Tools] [Image Updater].
[Download Procedures]
1 Connect the 232C I/F jigs above way.
D
2 Connect the FFC cable of the download jig to CN1402 of MAIN ASSY and the power cable to the unit. 3 Turn on the PC and set the communication baud rate of 232C to 115, 200 bps. 4 Initiate the Image Updater by selecting [Start] [Program] [EMMA2RL Turnkey Image Tools]
[Image Updater].
5 When the Image updater is initiated, select the port to the connecting port (COM1, etc). 6 Click [���] of the "Main Board" line on the extream right, and select the download program "DVR_231M.***file".
E
7 After selecting the download program, push the "Start" button. 8 When the status screen is displayed, turn the DVD recorder on. The writing of the firmware begins. (It's takes about 5 minutes for updating the firmware.) 9 After finishing the update, push "OK" button, and then finish the Image Updater by pushing "Stop" button. 0 Unplug the power cable first, and then the FFC cable. (Be sure tp keep this order.)
F
50
1 2
DVR-231-S
3 4
|
|
|
> |
|