|
|
|
Categories
|
|
Information
|
|
Featured Product
|
|
|
 |
|
|
There are currently no product reviews.
 ;
Everything was great, the manual, the response time, the simplicity of the order, and the
Price. The only thing that I could possible say on a negative note would be that the manual I ordered was more for a service tech. There were a lot of schematic diagrams that didn't help me solve the problem. However I would order again and recommend the web sight to others.
 ;
I'd been looking for this manual for awhile. Exactly what I needed - and at an excellant price. Thanks!
;
very complete. acceptable resolution. details are a little unclear. is a manual note 8.
;
excellent service - fast purchase - easy download - will buy from again
;
Manual is actually a pack of schematics, good quality pictures.
A
[3] [4]
(S-1) [1] (S-1)
(L-1)
(L-3) [5] (S-1A) [6] (P-1) B (L-2)
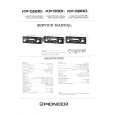
Installation of [3] and [6]
First, insert [6] diagonally in [3] as shown below. Then, install [6] in [3] while pushing (L-1) in the direction of the arrow. After installing [6] in [3], confirm that pin A of [3] enters hole A of [6] properly. [3]
Fig. DM3H
Pin D Pin C [2] A 1 Slide 2 Pull up
View for A
1
(L-1)
2
[6]
Hole A Pin A
Installation of [4] and [6]
Install [6] in [4] while pulling (L-2) in the direction of the arrow. After installing [6] in [4], confirm that pin B of [4] enters hole B of [6] properly. [4]
Pin A
Pin B Slot A
View for B
Hole B Pin B
(L-2)
[6]
Slots B
Fig. DM5H
Slot A First, while pushing the locking tab as shown in the right, slide and pull up the right side on [2] to release Pin A and Pin B from the slots A. Then, remove Pin C and Pin D on [2] from the slots B as shown. Locking tab View for A
Fig. DM4H
2-4-4
U29PHSDA
|
|
|
> |
|