|
|
|
Categories
|
|
Information
|
|
Featured Product
|
|
|
 |
|
|
There are currently no product reviews.
 ;
I expect a wonderful result as alaways!!!!!!
Usually is much faster....
;
Wow very wonderful and clear!!!! I will always trust them
;
Providing the manual works fine, quickly and without any problems for an acceptable price. After printing the service manual it took me only a short time to repair my carradio from Clarion. Thank You! Greetings from Heiko
;
I was searching a way to modify the original phono-in entry (for connection of vynil disc player, with RIAA equalization) to a line-in entry (for connection of modern analog entries, eg. ipod, mp3player).
This service manual gave me the correct hints.
It contains very useful infos for repairing and modifing the hi-fi, such as disassembling instructions, block diagrams, schematic diagrams, PCB prints, replacement parts list.
Very good!
;
Great Job!!! clear and efficient as always!!
it is really nice to have peple that are doing such a good work!!!!!
5
6
7
8
6. ADJUSTMENT
[Purpose]
If the combination of MAIN Assy and LOADER Assy is changed, the adjusted value for LD power will be shifted, and stable playback or recording of a disc will become impossible. Therefore, when the combination of MAIN Assy and LOADER Assy is changed, LD power adjustment and adjustment for disc judgment will be necessary. Be sure to do this adjustment at following cases. � When replacing MAIN Assy � When replacing LOADER Assy
[Tools to be used]
� Special tool for adjusting the LD power (GGF1559) � 10-pin FFC flexible cable (GGD1477) � CD-ROM test disc: CDT-313 (GGV1054) � DVD dual-layer test disc: DVDT-002 (GGV1036)
A
[Notes]
Never turn the power off while any of the following operations is in progress: � While laser diode (LD) power adjustment is being performed normally by the unit � While adjustment for disc judgment is being performed
B
[Connections]
� Connections for adjusting the LD power
Special tool for adjusting the LD power
POWER SUPPLY Unit HDD
C
Main Assy and writer
Note: Before adjusting the LD power, disconnect the power to the HDD and the flexible cable for ATA (40-pin). � To which the special tool for adjusting the LD power is connected
The right side (see the figure below) of the connector is for connection of the flexible cable. CN5601
D
Main Assy
CN1402 CN1401
Special tool for adjusting the LD power
Connect the 10-pin flexible cable to the lower part of CN401.
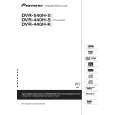
� Setting of the switches on the special tool for adjusting the LD power
E
ON ON ON ON ON
Set all five switches to ON.
F
DVR-640H-AV
5 6 7 8
83
|
|
|
> |
|