|
There are currently no product reviews.
 ;
The manual was made available promptly. I is a clean scan of the original. I had no problem downloading it. The scan was well centered and cleanly formatted. It is as good a product as can be had without being the original document.
 ;
Received downlink in less then 8 hours, Item was in good copy condition, and told me how to program the clock timer. The price was very resonable, and the process was very automated and was GREAT to work with.
;
Fast service, document is OK. Thanks! Searched for it long time.
;
I was very pleased with the manual I got for my amateur (ham) radio. Without it I could not figure out how to input and/or change the P/L setting on my radio. It drove me nuts as the radio was essentially useless. That all changed when my manual came. Then it took only minutes and I was done. Now my radio works fine. This is an exceptionally good resource as it's a very easy and user friendly download. Thank you very much! Dziękujemy za!
;
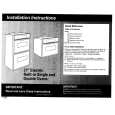
It answered my question, which was how to load the paper. I did notice that the very end of the manual was not visible.
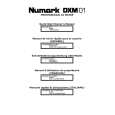
MISCHPULT SCHNELLAUFBAUANLEITUNG (DEUTSCH)
Versichern Sie sich, da� alle im Anfang dieser Anleitung aufgeführten Teile in der Schachtel enthalten sind. 2. LESEN SIE DIE SICHERHEITSBROSCH�RE BEVOR SIE DAS GER�T BENUTZEN. 3. Sehen Sie sich dieses Aufbaudiagramm sorgfältig an. 4. Stellen Sie das Mischpult an eine für den Betrieb geeignete Stelle. 5. Stellen Sie sicher, da� sämtliche Vorrichtungen ausgeschaltet sind und alle Fader und Regler auf �Null� stehen. 6. Schlie�en Sie alle Stereoeingabequellen wie im Diagramm gezeigt an. 7. Schlie�en Sie die Stereoausgänge an den (die) Verstärker, Kassettendecks und/oder andere Tonquellen an. 8. Schlie�en Sie das Mischpult und die anderen Geräte an eine Wechselstromversorgung an. 9. Schalten Sie alles in der folgenden Reihenfolge ein. � Toneingabequellen (z.B. Plattenspieler oder CD-Spieler) � Ihr Mischpult � zuletzt, vorhandene Verstärker 10. Beim Ausschalten drehen Sie die Reihenfolge um und schalten Sie � Verstärker � Ihr Mischpult � und zuletzt, vorhandene Eingabequellen, aus 11. Um das Produkt zu registrieren, besuchen Sie bitte http://www.numark.com. Mehr Informationen über dieses Produkt können auf http://www.numark.com gefunden werden. 1.
 $4.99 DXM01 NUMARK
Quick Start Quick start guide ( sometimes called quick guide ) contains most important information on how to use…
|