|
|
|
Categories
|
|
Information
|
|
Featured Product
|
|
|
 |
|
|
There are currently no product reviews.
 ;
Complete service manual in very good scanning quality with all schematic and PWB graphics as well as assembly & maintenance instructions. A slight drawback is that the rastering of the PWB graphics sometimes makes it a bit difficult to follow fine traces, but no showstopper.
;
Purchased the manual that I was looking for at a great price and could download it easily.. Great service experience and for future purchases I plan to use the site. Thank you very much
 ;
Service manual in good quality, it was very helpful to me. Perfect service, I am very satisfied.
Jochen Kelm
;
Exellent manual ,it was in great condition,and got all the info i expected,5 stars!!
;
I searched the Internet exhaustively for this manual and Owner-Manuals was the least expensive...but provided an excellent reproduction within 4 hours. Very satisified.
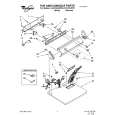
Troubleshooting > Procedure for Removing Disc from Faulty DZ-MV380A 1) Turn the hood (a) in the direction of the arrow to remove it. (See Fig. 4-8-1) 2) Remove three screws [A], and then remove the filter piece (b). Be careful not to scratch the lens surface with screwdriver at this time. 3) Remove the lens cover (c) in the direction of the arrow. 4) Remove the shoe cover in the direction of the arrow. 5) Remove four screws [X]. 6) Move the parts of the accessory shoe in the direction of the arrow.
1 (b) 3 (c) 6 (e) (d)
(a) Hood (b) Filter Piece (c) Lens Cover (d) Shoe Cover (e) Parts of Accessory Shoe (f) Accessory Shoe
5 [X] 4
[A] M1.7�4 (Black)
[X] M2�2.5 (Black)
2 [A] (a)
(f)
Fig. 4-8-1 How to Remove Disc 7) Insert a screwdriver, etc. into the hole in accessory shoe at the top of product, and move the lock arm (g) in the direction of the arrow to open the disc loading block. (See Fig. 4-8-2) 8) After removing the disc, close the disc loading block to protect the disc drive unit. When reinstalling removed components, use the reverse procedure to removal. 9) After work, reinstall part of accessory shoe and screws [X] to the accessory shoe: The accessory shoe is set as a service part, including screws [X].
(g)
(g) Lock Arm
Fig. 4-8-2 How to Remove Disc
4 - 10
|
|
|
> |
|