|
There are currently no product reviews.
 ;
everything was fine - fast, readable, worth the price
;
I'm happy to get a manual from this rare old amp. The pdf is from good qualty.
;
very quick service and manual as described - would happily trade here again!
;
Fast Download,all pages present,an excellent copy.THis enabled to find the origional part numbers and chase them up. The cartridge is proving difficult to find but at least I know the origional part number.Thanks to all.
;
The manual was as described. Complete with parts list and technical information. Fast delivery.
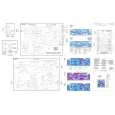
D
Demontage
GB
Disassembly
Demontageschritte Disassembly steps
Entfernen, entriegeln, abziehen Remove, unlock, disconnect
Bemerkungen Remarks
Fig. Fig.
Frontblende (F), Front Panel (F)
Release Panel Release Panel
abnehmen remove
Schrauben (2xE) Screws (2xE)
abschrauben unscrew
1
Feder (2xD) Spring (2xD)
entfernen remove
1
Rahmen (B) Frame (B)
Rahmen vorsichtig abziehen. Carefully remove the Frame.
1+2
Schrauben (4xG) Screws (4xG)
abschrauben unscrew
2
Frontblende (F) Front panel (F)
Frontblende vorsichtig abziehen. Carefully remove the front panel.
Laufwerk (C), Mechanism (C) (ADC 1400 + TN 705)
Schrauben (4xA) Screws (4xA)
abschrauben unscrew
3
X 1110 + X 1302 X 1110 + X 1302
vorsichtig abziehen carefully unplug
3
Laufwerk (C) Mechanism (C)
Laufwerk vorsichtig nach oben abheben. Carefully lift out the mechanism.
3
Laufwerk (K), Mechanism (K) (TN 708)
Schrauben (4xA) Screws (4xA)
abschrauben unscrew
4
Laufwerk (K) Mechanism (K)
Laufwerk vorsichtig nach oben abheben. Carefully lift out the mechanism.
4
X 1301 X 1301
vorsichtig abziehen carefully unplug
5
-6-
|