|
|
|
Categories
|
|
Information
|
|
Featured Product
|
|
|
 |
|
|
There are currently no product reviews.
 ;
So usefull to make my installation a breeze. 5 stars on quality.
;
very helpful, the information in these manuels are very detailed
;
Please tell us what you think and share your opinions with others. Be sure to focus your comments on the product. You will receive $2.00 of store credit for Your review.
;
Please tell us what you think and share your opinions with others. Be sure to focus your comments on the product. You will receive $2.00 of store credit for Your review.
;
Good copy and great customer service! There was some confusion with my order and it was resolved promptly!
i
I
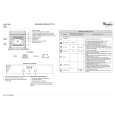
Pull out to the stop, lift the front iI/l &dpullagain.
Removing and cover
the crisper,
meat drawer
Remove
the
To remove the crisper and meat drawer: 1. Slide crisper and meat drawer straight out to the stop, lift drawer, then slide out the rest of the way. 2. Replace in reverse order. To remove crisper cover: 1. Push up crisper cover glass insert from bottom, then slide out with both hands. 2. Lift front of cover frame. 3. Lift out cover frame by pulling up and out. 4. Remove metal cover support. To replace crisper cover: 1. Replace metal cover support on wall supports in front section of cabinet. 2. Fit back corners into notch supports on walls of refrigerator, then lower into place. 3. Slide back of glass insert into place, then lower front. Adjusting the meat drawer temperature Cold air flows against the meat drawer through an opening between the freezer and the refrigerator. This helps keep the meat drawer colder than the rest of the refrigerator. Slide the control to let more or less cold air through.
Use control to adjust meat drawer
temperature.
I
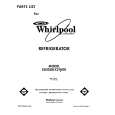
Removing the freezer bin For proper air movement, keep the freezer bin in place when the refrigerator is operating. To remove the bin: 1. Slide bin out to the stop. 2. Lift the front to clear the stop. 3. Slide out the rest of the way. To replace the bin: 1. Place bin on the slides. 2. Make sure the stops clear the front of the slides. 3. Slide bin in.
7
|
|
|
> |
|