|
|
|
Categories
|
|
Information
|
|
Featured Product
|
|
|
 |
|
|
There are currently no product reviews.
 ;
Manual was complete and available promptly, since I had lost my original manual. Very good response.
;
Whilst this is a photo copy, and some of the pages are a little askew, it was all readable and intact. A real bonus finding an old manual for a classic piece of kit that no other site had.
Great stuff.
;
excellent quality, contains circuits and scan quality, 110 pages
;
It was easy done, and I got exactly what I was looking for.
;
The manuel was exactly what I needed and I received it promptly. Thanks
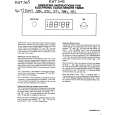
Adjusting
meat pan temperature.
..
Removing freezer bin.. .
Fcx proper air movement, keep the freezer bin in place when the refrigerator is operating.
Cold air flows against the meat pan through an opening between the freezer and the refrigerator. This helps keep the meat pan colder than the rest of the refrigerator. Set the control to let mote or less cold air through.
To remove the bln:
l l l l l l
Slide out to the stop. Lift the front to clear the stop. Slide out the rest of the way.
To replace
the bln:
Use Control to AdJust Meat Pan Temperatures
Place bin on theslides. Make sure the stops clea the front of the slides. Slide bin in.
Adjusting the refrigerator shelves...
Shelves can be adjusted to match the way you use your refrigerator. Glass shelves are strong enough to hold bottles, milk and other heavv food items.
To remove glass shelves:
1. Tilt up at front. 2. Lift up at back. 3. Pull shelf straight out. ,
Removing freezer shelves.. .
l l l
Lift front sliahtlv. Lift back 03 su�poorts. Replace in reverse order. Lltt the Front Then the Back
II G
1. Guide the rear hooks into the slots in the shelf supports. 2. Tilt up front of shelf until hooks drop into slot. Lower front of shelf to level position.
Removing the crisper, meat pan and covers.. .
0 Slide crisper and meat pan straight out to stop l Lift the front. l Slide the rest of the way out. l Replace in reverse order.
Clear the Cover.
Snap Back Into Place.
l
Covers are held in place by two pegs at the back and two notched tabs in front. - Press front tabs out of the way. -Lift cover front. -Lift back off the pegs. - Replace in reverse order.
6
|
|
|
> |
|