|
|
|
Categories
|
|
Information
|
|
Featured Product
|
|
|
 |
|
|
There are currently no product reviews.
 ;
The manual was complete and of great quality. Originally a tri-lingual file, I first received only one language. After a note to owners-manuals.com, I quickly received the remaining languages... Great service, definitely worth it.
;
Thank you for providing this manual and at low cost.
The Philips scope is of excellent quality, longevity and build and had a couple of faults
when it was passed to me. Having the CCT diagrams is a blessing.
I have fixed the problems and also modded the scope to my requirements.
I have built a 24v Li-Ion pack for portable use from old but good laptop batts.
it is working beautifully and I am well pleased. Keep up the good work Guys.
 ;
manual was very helpful in learning how to propery use my washer. I could not find this manual anywhere else.
;
Awesome quality manual. You really saved my bacon with this one. Was looking for some specific information with regards to my "new" vintage VCR that didn't come with the owners manual. This site is truely a goldmine of available manuals. The quality of the scans are top notch.
Thank-you so much for this awesome manual. If you're looking for this Sony SL-HF400 owners manual, this is the one you NEED to buy. Definitely worth the money.
;
The manual was made available promptly. I is a clean scan of the original. I had no problem downloading it. The scan was well centered and cleanly formatted. It is as good a product as can be had without being the original document.
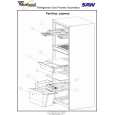
To replace the covers: 1. Replace metal cover support on wall supports in front section of cabinet. 2. Fii back corners of cover frame into notched supports on liner walls, then lower front of cover frame into place. 3. Slide back of glass insert into place, then lower front.
Adjusting
the crisper
humidity
control
You can control the amount of humidity in the moisture-sealed crisper. l The control can be adjusted to any setting between LOW and HIGH. l LOW (open) lets moist air out of the crisper for best storage of fruits and vegetables with skins. l HIGH (closed) keeps moist air in the crisper for best storage of fresh, leafy vegetables.
Adjusting
the meat drawer
Use control
temperature
Cold air flows against the meat drawer through an opening between the freezer and the refrigerator. This helps keep the meat drawer colder than the rest of the refrigerator for better storage of meats. Slide the control to let more or less cold air through.
to adjust meat drawer tsmperatura
Removing
the snack
bin
To remOve the snack bin: 1. Slide snack bin straight out to the stop with an even, constant motion. 2. Lift the front. 3. Slide bin out the rest of the way. 4. Replace in reverse order.
Pull out to Ihe
stop, lift the front and pull again.
10
|
|
|
> |
|