|
There are currently no product reviews.
 ;
excellent quality, contains circuits and scan quality, 226 pages
 ;
Great price for the manual and easy to locate on the site and download. I would buy again.
;
Very good copy of Manual, clear and easy to print off, arrived very promptly and reasonably priced. Thanks, I will use you again
;
The service manual when downloaded and printed out was clear and easy to read. The manual is complete with the schematic diagram and technical data. I occasionally require a manual and now having registered with this company I shall order from them in the future.
;
Great manual, great price. I am very pleased with Owner-Manuals.com, quick service, fast communication. Will definitely use this site again.
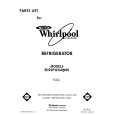
To replace the covers: 1. Replace metal cover support on wall supports in front section of cabinet. 2. Fii back corners of cover frame into notched supports on liner walls, then lower front of cover frame into place. 3. Slide back of glass insert into place, then lower front.
Adjusting
the crisper
humidity
control
You can control the amount of humidity in the moisture-sealed crisper. l The control can be adjusted to any setting between LOW and HIGH. l LOW (open) lets moist air out of the crisper for best storage of fruits and vegetables with skins. l HIGH (closed) keeps moist air in the crisper for best storage of fresh, leafy vegetables.
Adjusting
the meat drawer
Use control
temperature
Cold air flows against the meat drawer through an opening between the freezer and the refrigerator. This helps keep the meat drawer colder than the rest of the refrigerator for better storage of meats. Slide the control to let more or less cold air through.
to adjust meat drawer tsmperatura
Removing
the snack
bin
To remOve the snack bin: 1. Slide snack bin straight out to the stop with an even, constant motion. 2. Lift the front. 3. Slide bin out the rest of the way. 4. Replace in reverse order.
Pull out to Ihe
stop, lift the front and pull again.
10
|