|
|
|
Categories
|
|
Information
|
|
Featured Product
|
|
|
 |
|
|
There are currently no product reviews.
 ;
It is perfect, exactly what we needed. It's like the paper version but less clutter.
 ;
Received my manual within 24 hours. Very clear scan of the manual I needed. Thanks!
;
Very clear scan, I recommend it. Definitely a must have for any 3362 owner.
Alpine could have written a slightly more complete manual, though. It's already pretty huge, but the unit has so many functions, I feel some more explanation would have been better.
Yamaha's manual of their comparable YDSP-1 is a little better in my opinion.
;
Immediate response with excellent service - highly reccommended
;
Correct manual received and of good quality but the contents of the file for the Service Manual for the same monitor is for a 20" TV not the RGB Monitor.
-,
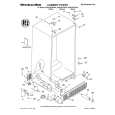
Removing
l l l
freezer shelves. . .
Changing
phmce bulbs
light bulbs.. .
only
Lift front sliahtlv. Lift back 05 supports Replace in reverse order. Lift the Front Then the Back
Before removing a light shreld for cleaning or for replacing a bulb, unplug the refrigerator. Use op-
Removing
the freezer basket...
Pull on Pull Out at light bulbs behind refrigerate; and freezer control consoles: - Pull control knob straight off. - Pull bottom of control panel straight out. -Lift top of panel off supports. - Replace with a 40.watt appliance bulb. - Replace panel In reverse order. l light bulb behind ice maker: - Remove the Ice bin (see ice maker rnstructions page6). - Replace with a 40.watt appliance bulb. -Replace Ice bin Dispenser light: l - Reach the bulb through the dispenser area. - Replace with a heavy-duty IO-watt bulb.
a.<,.. **�WY-,e*,, 1 r,-..*..LY,-.a.l~-.J es.~.~.T -5
For proper air movement, keep the freezer basket In place when the refrigerator IS operatrng To remove the basket: l Slrde out to the stop Lift the front to clear l the stop Slrde out the rest l of the way
To replace the basket: % l Place basket on the slrdes l Make sure the wrre stops clear the front of theslrdes l Slide basket tn ~I. I.sEx_..r. NJ*L �.._/ �.5,..I~.~U,S, ~.a,&�,>T ? :, c** iii*e.az,_.rlL
Removing the crisper, and covers.. .
l l l l
meat pan
Removing
l
the base grille...
Open the doors
Slrde crisper and meat pan straight out to stop Lrft the front. Slide the rest of the way out Replace in reverse order. Push the lab to Clear the Cover.
l l
Pull grille outwards as shown Do not remove Tech sheet fastened behind grille.
Snap Back into Place.
l
Covers are held In place by two pegs at the back and two notched tabs In front - Press front tabs out of the way -Lift cover front. -Lift back off the pegs - Replace in reverse order
To replace: Line up grille support tabs with metal clips. l Push firmly to snap into place l Close the doors.
l
|
|
|
> |
|