|
|
|
Categories
|
|
Information
|
|
Featured Product
|
|
|
 |
|
|
There are currently no product reviews.
 ;
The manual for Sony LBT-D505 component stereo system is was excellent , with schematics, parts layout and parts list as well as instructions for adjustments for each component. Print was clear even when enlarged.
;
It's exactly a complete and very useful manual with all details what I needed. Thank you!I will come back whenever I need your manuals or schematics.
;
I searched EVERYWHERE looking for the manual/s on this "extinct" amp. Owner-Manuals.com made it available and for nearly nothing. Thanx to them, I can decipher the unknown cables and sort them out. Thanx, Owner-Manuals.com!!
;
Yes thank you i got the file i was after. There was a slight problem in my communication but it all worked out well.
A job well done.
 ;
Great manual...really saved me. The only problem is that I thought I would be able to download it directly when I paid for it but never received the download instructions until the next morning. The board trace pages were somewhat light also: really need to turn up the contrast on the printer before printing them. The schematic page was great; very clear! Well worth the money.
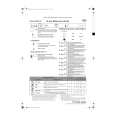
Replacing the Lamp
All projector lamps will wear out eventually. If used for long periods of time, the image could become darkened, and the color contrast could be impacted as well. We recommend that you replace your lamps early. If the LAMP indicator turns red, or a message prompts you to replace the lamp when you power up the projector, the lamp needs to be replaced. (See "Related Messages" and "Regarding the Indicator Lamps" for details.)
1
Turn off the projector, and unplug the power cord. Allow the lamp bulb to cool for at least 45 minutes, and prepare a new lamp (sold separately: DT00511 for CPS317/EPS3170/EPS3170A or / DT00521 for CPX327/EDX3270/EDX3270A)
5
Insert the new lamp, and tighten the 1 screw firmly to lock it in place
� Also steadily push the opposite side of the screwed side of the lamp into the unit.
2
After making sure that the projector has cooled adequately, slowly flip over the projector, so that the bottom is facing up
3
Unscrew the 2 screws, and remove the lamp cover
6
Replace the lamp cover, and tighten the 2 screws firmly to lock it in place
4
Unscrew the 1 screw, and slowly pull out the lamp by the handle
� Be careful not to touch the inside of the lamp case.
7 8
Slowly turn the projector so that the top is facing up Turn on the projector power, and using the menu, reset the lamp timer
� To reset the lamp timer, from the OPTION menu, select LAMP TIME.
ATTENTION � Make sure that the screws are screwed in firmly. Loose screws could result in damage or injury.
� Do not use with lamp cover removed. � Do not reset the lamp timer without replacing the lamp. Reset the lamp timer always when replacing the lamp. The message functions will not operate properly if the lamp timer is not reset correctly. � When the lamp has been replaced after the message of "CHANGE THE LAMP ...THE POWER WILL TURN OFF AFTER 0 hr." is displayed, or the LAMP indicator is red, complete the following operation within 10 minutes of switching power ON.
NOTE
� The LAMP indicator is also red when the lamp unit reaches high temperature.
Before replacing the lamp, switch power OFF, wait approximately 20 minutes, and switch power ON again. If the LAMP indicator is still red, replace the lamp.
22
|
|
|
> |
|