I was so happy that the owner's manual was available. It is well written and helped me to use the radio/CD player/recorder without problems. Thanks for making it available.
Irene Lambert
Thanks so much for the Owner's manual for my Sony PS - FL1. I had purchased the turntable off of eBay. It came in and looked great. Packed well and appeared to be great. I balanced and aligned the tone are and hooked it up. When trying to play a record the tone are would move to the right place and just before it would drop to play it moved back off the edge of the record before touching down. I searched the net for an answer to this issue. No luck. Then I purchased the owners manual and sure enough there was a place to adjust where the stylus touched down. That adjustment solved the problem and saved me a $35 feet to have the player checked out. The manual is well written and easy to understand. It is a must have for anyone with this front loading Sony turntable.
Some years back I pruchased a Sansui G-9000. I had it cleaned up and a problem with the left channel repaired. When I got it back I hooked it up to my tape decks, turn tables, TV and it played great. The only thing I was not really satisfied with was the performance of my Graphic Equalizer. I purchased this owner's manual had poured myself a cup of coffee. The manual is well organized and written in plain language. It also contained the solution to my dissatisfaction. By using the preamp connections coupled I was able to run everything through my graphic equalizer and now enjoy the full potential of my complete system.
An excellent service for the price, however, it would also have been handy if the troubleshooter pages were included. The manual is only sent in the language of your country, thus it looks as though there are some pages missing. Otherwise highly recommended.
Text excerpt from page 7 (click to view)
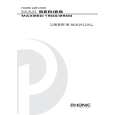
INSTALLATION
Wall drilling and bracket fixing
7.2.1
650 min.
7.1
95
95
Wall marking: � Draw a vertical line on the supporting wall up to the ceiling, or as high as practical, at the centre of the area in which the hood will be installed. � Draw a horizontal line at 650 mm above the hob for installation without the back panel, or at height H (H=height of the visible part of the panel) for installation with the back panel. � Place bracket 7.2.1 on the wall as shown about 1-2 mm from the ceiling or upper limit aligning the centre (notch) with the vertical reference line. � Mark the wall at the centres of the holes in the bracket. � Place bracket 7.2.1 on the wall as shown at X mm below the first bracket (X = height of the upper chimney section supplied), aligning the centre (notch) with the vertical line. � Mark the wall at the centres of the holes in the bracket. � Place bracket 7.1 as shown 95 mm from the vertical reference line and 210 mm above the horizontal reference line. � Mark the centres of the holes in the bracket. � Repeat this operation on the other side. REAR PANEL (OPTIONAL) The Rear Panel must be fitted before fixing the hood body and, if it is to be fixed at both top and bottom, must be fitted at the correct height prior to installing the bases. As this operation is rather complex, it should be carried out either by the kitchen installer or a qualified person who knows the final dimensions of the units. For fixing at the top only, proceed as follows: � Rest the back panel on the base, inserting the lower plate between the upper surface and the wall, centring it on the vertical reference line. � Mark the centres of the two holes in the upper plate. � Drill ø 8 mm holes at all the centre points marked. � Insert the wall plugs 11 in the holes. � Fix the brackets using the 12a screws (4,2 x 44,4) supplied. � Fix the back panel (where present) using the 12a (4,2 x 44,4) screws supplied.