Thanks to Owner-Manuals.com! This manual was exactly what I needed. As Amana was purchased by Maytag and later by Whirlpool, there was no way to receive it from their websites. I was lucky to find this resource.
Great to be able to set channels again, on an old but stoll fine working TV
Text excerpt from page 10 (click to view)
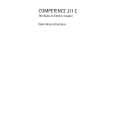
Mounting of cooker hood on wall
1. Mark out where the 4 holes shall be drilled on the wall. Drill in the markings with an �8 mm drill and fit rawl plugs into the holes. Use the template printed on the packaging. 2. Fix the screws (A) (see picture). Leave about 5 mm distance between the screws and the wall. 3. Hook the cooker hood on the screws (A). 4. Remove the grease filter and mount the screws (B) in the two lower holes. Remove the grease filter by pulling it backwards (against the wall) and then downwards. 5. Tighten the screws (A). 6. Mount the grease filter.
A
B
Mounting the cold air valve
Not applicable for recirculation. The cold air valve consists of a damper seat with two valves, which shall be fitted into the hood outlet (see picture). If there is no other form of ventilation to expel air from the kitchen than the hood, the outer end of the valves should be clipped off and removed. Insert a pen or something similar between the valves. These should open up easily now.
A B
C
Fitting the carbon filter
Only applicable for recirculation. The LONG LIFE carbon filter (special accessory) for this hood is fitted instead of the grease filter. The LONG LIFE carbon filter is both a grease and carbon filter for reduction of cooking smells. An opening must be made at the top or front of the cupboard (min. 100 cm²) where the hood is fitted, so the cleaned air can freely circulate back into the kitchen. Use venting grid PNC 391 433 101 (extra equipment)
Mounting the venting kit (see picture)
Extend the duct hose correctly. A duct hose which is too long or has too many bends can reduce cooker hood efficiency by fifty per cent. Shorten the hose if it is too long, and avoid unnecessary bends in it.
C
A complete venting kit is available as an optional extra. The ventilation pipe (A) is pulled over the hood�s evacuation flange (B) and is held firmly in place with a clamp. Make sure the pipe is as straight as possible and does not hinder the movement of the valve flaps. The pipe is connected to the mouth of the duct with the metal flange (C) which is included in the kit.