|
|
|
Categories
|
|
Information
|
|
Featured Product
|
|
|
 |
|
|
There are currently no product reviews.
 ;
This place is amazing. Got our manual in a few hours. Print quality is excellent. Even the manufacturer didn't have this manual. The price was excellent. How many more stars can I give them? More than satisfied.
;
This was a very hard to find manual. The unit is long discontinued and Pioneer doesn't retain every manual for every model. Thanks owner's-manual.com!
 ;
I'm so glad I was able to find a site to download my missing manuals. Very reasonable prices and they kept me informed about the process and I had my manual within less than a day. The only thing I wish was an option is a 100% English version with no spanish or anything. But overall great site.
;
The manual is complete with excellent quality! One suggestion, show number of pages and weather it is multi-lingual. The AD 600 Manuel is about 76 pages and over half is non English. This results in a larger print job than usually needed. Having this information, one could select the desired pages for printing.
;
I've been looking for a copy of the original user/owner manual. Just what the doctor ordered, thank you.
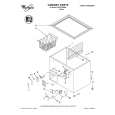
IN STA LLI NG Y OU R FR EE Z ER
Choosing the proper location
Read the following items before choosing the location for the freezer. See �Completing the installation� below before sliding freezer into place. 1. Pick a safe place, indoors, away from flammables such as gasoline. 2. Check the strength of the floor. It should hold the weight of a fully loaded freezer. 3. Allow at least 3 inches (7.5 cm) of air space on both sides of the freezer and 2 inches (5 cm) between the back of the freezer and the wall. Leave room above the freezer to open the lid. 4. It should not be necessary to remove the lid during installation. If, for any reason, the hinges need adjustment, see the label on the back of your freezer and contact an authorized Whirlpool service company. NOTE: Do not cover the freezer with items such as blankets, sheets, tablecloths, etc. This reduces air circulation.
Room to open lid
2 inches at back
±
3 inches at sides
Completing the installation
Level the freezer from side to side and front to back so that the lid will seal properly. Use shim(s) to level the freezer if necessary.
Installing the defrost drain cover
(on some models)
1. Remove defrost drain cover from the literature package. 2. Push drain cover into drain hole as illustrated.
6
±
±
±
±
|
|
|
> |
|