Actually, I was looking for this information for 3 years!...now thanks to you, the manual is on my hands and of great help, cause I understand now where I was doing wrong connections and wires...excellent, I'll be back to you if in need, thank you.
This manual covers the main equipment features only. While it also includes the procedure for saving and loading from the now long obsolete memory cards it does not mention the how to operate with the optional floppy drive interface so I am still at a loss about how to use this! Note that there is a separate manual covering the MIDI interface and programming via the keyboard, not included in this download. You will also need to get hold of this if you want to use the MIDI interface properly. Basically there is little difference between this manual and the free to download manual for the similar PR60 model.
Good list of manuals. I found a very rare one and easily get. Should be promptly to download, as we must to wait hours even after confirmed payment.
Text excerpt from page 6 (click to view)
GB
The cooker must be installed by a qualified person in accordance with the Gas Safety (Installation and Use) (Amendment) Regulations 1990 and the relevant building/I.E.E. Regulations. Failure to install the appliance correctly could invalidate any manufacturers warranty and lead to prosecution under the above quoted regulations. Provision for Ventilation The room containing the cooker should have an air supply in accordance with BS 5440: Part 2: 1989. The room must have an opening windows or equivalent; some rooms may also require a permanent vent. If the room has a volume between 5 and 10m3, it will require an air vent of 50cm2 effective area unless it has a door which opens directly to the outside. If the room has a volume of less than 5m3, it will require an air vent of 100cm2 effective area. If there are other fuel burning appliances in the same room, BS 5440: Part 2: 1989 should be consulted to determine air vent requirements. Ensure that the room containing the cooker is well ventilated, keep natural ventilation holes or install a mechanical ventilation device (mechanical cooker hood). Prolonged intensive use of the appliance may call for additionalventilation, for example opening of a window, or more effective ventilation, for example increasing the level of mechanical ventilation where present. This cooker is not fitted with a device for discharging the products of combustion. Ensure that the ventilation rules and regulations are followed. Excess steam from the oven, vents out at the top back edge of the cooker, so make sure that the walls behind and near the cooker are resistant to heat, steam and condensation. Your cooker must stand on a flat surface so that when it is in position the hob is level. When in position check that the cooker is level by using a spirit level and adjust the 2 feet at the rear and the 2 feet at the front if necessary. It is important that the cooker is stable and level for the overall cooking performance. Remember that the quantity of air necessary for combustion must never be less than 2m3/h for each kW of power (see total power in kW on the appliance data plate fig. 9
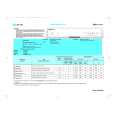
min. 50 mm
min. 50 mm
min.100 mm "0" mm "0" mm
Location Your cooker is heavy, so be careful when moving or positioning it. Do not try to move the cooker by pulling on the doors, handles or control panel. The cooker is designed to �slot in� between 600mm deep cabinets, spaced approximately 1000mm apart. It can also be used free-standing, with a cabinet to one side, in a corner setting or with its back to a wall. In case of installation between kitchen units, their sides must withstand a temperature of at least 90 degrees C. The wall behind the cooker and 450mm above and across the width of the cooker, should be an incombustible material or easy clean 895 surface such as ceramic tiles. Any overhanging surface or cooker hood should be at least 650mm (30�) above the cooker hob. We do not recommend positioning the cooker below wall cupboards, as the heat and steam from the cooker may cause damage to the cupboard and its contents. The cooker may be located in a kitchen, or a bed-sitting room, but not in a room containing a bath or shower. The cooker must not be installed in a bed-sitting room of less than 20m3 . LPG Models must not be installed in a room or internal space below ground level, e.g. in a basement.
min. 400 mm
min. 650 mm
* ).
The cooker is fitted with 4 legs for easy adjustment of height to suit adjacent furniture. To assemble legs, lift the cooker up and screw the four legs into the suitable threadings located at the corners on the underside of the appliance ( fig 8).
Gas Safety (Installation & Use) Regulations It is the law that all gas appliances are installed by competent persons in accordance with the current edition of the Installation & Use Regulations. It is in your interest and that of safety to ensure compliance with the law. In the UK, CORGI registered installers work to safe standards of practice. The cooker must also be installed in accordance with BS 6172: 1990. Failure to install the cooker correctly could invalidate the warranty liability claims and could lead to prosecution. Gas Connection Prior to installation, ensure that the local distribution conditions (nature of the gas and gas pressure) and the adjustment conditions are compatible. The adjustment conditions for this appliance are stated on the rating plate which can be found on the inside of the front appliance drawer. This appliance is not designed to be connected to a combustion products evacuation device. Particular attention should be given to the relevant requirements regarding ventilation. Connection to the cooker should be made with an approved appliance flexible connection to BS 669. Models for use with LPG should be fitted with a hose suitable for LPG and capable of withstanding 50mbar pressure. A length of 0.9 to 1.25m is recommended. The length of hose chosen should be such that when the cooker is in situ, the hose does not touch the floor. The temperature rise of areas at the rear of the cooker that are likely to come in contact with the flexible hose do not exceed 700C. Gas pressure may be checked on a semi-rapid hob burner. Remove the appropriate injector and attach a test nipple. Light the other burners and observe that the gas pressure complies with the gas standards in force.
OK
NO
Fig. 8
Fig. 9
CONNECTION This appliance shall be installed in accordance whit the regulations in force and only in a well-ventilated space. Read the instructions before installing or using this appliance. IMPORTANT This cooker is supplied for use on gas specified on the data plate of the appliance and cannot be used for any other gas without modification. Conversion for use on other gases must only be undertaken by a qualified person. For information for use on other gases contact your local Service Centre.
6
Certain models can be set for sypply both on the right or lefthand side. In this case it is sufficient to reverse the position of the cad nipple reducer. At the end make sure than there is no leakage of gas.