Very clear scan, I recommend it. Definitely a must have for any 3362 owner.
Alpine could have written a slightly more complete manual, though. It's already pretty huge, but the unit has so many functions, I feel some more explanation would have been better.
Yamaha's manual of their comparable YDSP-1 is a little better in my opinion.
Correct manual received and of good quality but the contents of the file for the Service Manual for the same monitor is for a 20" TV not the RGB Monitor.
Text excerpt from page 35 (click to view)
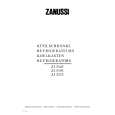
Connection of the hob
Please check the appliance for possibly occured transport damages. Only build in elements which are free of defects. When locating built--in cooking areas and hobs the front cross arm of the built--in cupboard must be removed in order to ensure unimpeded escape of the radiant heat. The cut--out dimensions for the worktop opening and the dimensions and hints for the mounting of the clamps please take from the installation instructions of hob or cooking area. Mainly built--in cooking areas and hobs are located above a built--under oven or control box. An intermediate bottom is required in case of a combination with a control box. This will ensure protection against accidental contact according to VDE-- or other local regulations. The following must be observed, if the hob will be installed in a different manner, i.e. without the builtunder oven or control box immediately underneath: The distance from the hob to the furniture part must at least amount to 130 mm.If needed, please fix an insulation. Drawers must not be located under a hotplate. The space under the hob must be closed to all sides in order to ensure the non--accessibility of the lower side. When installing hobs with design criteria different from the above, the installating instructions of this particular hob will have to be adhered to. Two 14-pole socket-contacts for the cooking zones /hotplates are located on the oven jacket. Please make sure that according to reference figures 1 - 2 - 3 - 4 the matching plugs of the hob are vertically plugged in from the top and will firmly snap into place. Position the connection cables at the side on the oven ceiling. Built-under ovens and built-in combination hobs are provided with special plug-in systems. A label on the oven and on the hob will give you advice with regard to admissible combinations. Please check: Field A --- Equipment with (R) or without (NR) residual heat indicator Field B --- Nominal voltage of the hob unit Field C --- Cooking zone or hotplates: The equipment reference on the hob label must be in conformity with one of the following diagrams.
ATTENTION! To ensure safety and trouble-free functioning, do connect only those hotplates/cooking zones, that are in conformity with the indications in fields A, B and C.
Prior to first use remove any possibly existing labels and protective foils from the front of the appliance. After connection to the power supply all heating elements are to be switched on shortly at maximum setting one after another, in order to check the operability. 35
The reference figures 1 - 2 - 3 - 4 are impressed on the plugs and on the bottom beneath the socket-contacts.