|
|
|
Categories
|
|
Information
|
|
Featured Product
|
|
|
 |
|
|
There are currently no product reviews.
 ;
This place is amazing. Got our manual in a few hours. Print quality is excellent. Even the manufacturer didn't have this manual. The price was excellent. How many more stars can I give them? More than satisfied.
;
This was a very hard to find manual. The unit is long discontinued and Pioneer doesn't retain every manual for every model. Thanks owner's-manual.com!
 ;
I'm so glad I was able to find a site to download my missing manuals. Very reasonable prices and they kept me informed about the process and I had my manual within less than a day. The only thing I wish was an option is a 100% English version with no spanish or anything. But overall great site.
;
The manual is complete with excellent quality! One suggestion, show number of pages and weather it is multi-lingual. The AD 600 Manuel is about 76 pages and over half is non English. This results in a larger print job than usually needed. Having this information, one could select the desired pages for printing.
;
I've been looking for a copy of the original user/owner manual. Just what the doctor ordered, thank you.
ERS Series Installation/Owner�s Manual
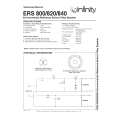
4. Strip the ends of the speaker wires about 3�8". Twist the wire strands together for terminal insertion. Connect the speaker wires to the appropriate speaker terminals on each speaker, as shown in Figure 3.
IMPORTANT: Make sure you observe the polarity codes (i.e., red is + and black is �).
AMPLIFIER (Rear View)
+ �
use wire with no ridge on jacket or silver wire
�
+
use wire with ridge on jacket or gold wire
ERS 840 (Rear View)
Figure 3. Example of correct wiring connections used on the ERS 840. Other models are wired similarly.
5. Before mounting the speakers, make sure the attached mounting frame is in the extended position (see Figure 2 on page 4). For each speaker, insert the bottom of the mounting frame (and cable) into its respective cavity. Insert the top of the mounting frame into the opening and slide the baffle up to fit the cutout. Equally tighten each of the four Phillips screws (already inserted) to sandwich the mounting frame against the wallboard, as shown in Figure 4 on page 6.
CAUTION: DO NOT OVERTIGHTEN SCREWS! Doing so may damage the assembly.
5
|
|
|
> |
|