|
|
|
Categories
|
|
Information
|
|
Featured Product
|
|
|
 |
|
|
There are currently no product reviews.
 ;
Thank´s for your help, I already recived these manual from you
;
Thank you for your manual It has the basic things to and i use the Oszi for Longer Time.
THX
;
Actually, I was looking for this information for 3 years!...now thanks to you, the manual is on my hands and of great help, cause I understand now where I was doing wrong connections and wires...excellent, I'll be back to you if in need, thank you.
 ;
This manual covers the main equipment features only. While it also includes the procedure for saving and loading from the now long obsolete memory cards it does not mention the how to operate with the optional floppy drive interface so I am still at a loss about how to use this! Note that there is a separate manual covering the MIDI interface and programming via the keyboard, not included in this download. You will also need to get hold of this if you want to use the MIDI interface properly. Basically there is little difference between this manual and the free to download manual for the similar PR60 model.
;
Good list of manuals. I found a very rare one and easily get. Should be promptly to download, as we must to wait hours even after confirmed payment.
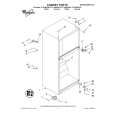
Removing
(on some models)
the meat drawer
and cover
Remove meat
To remove the meat drawer: 1. Slide meat drawer out to the stop.
2. Lift front of meat drawer. 3. Slide meat drawer out the rest of the way. 4. Replace in reverse order.
To remove the cover: 1. Remove meat drawer.
2. Push cover back to release rear clips from shelf. 3. Tilt cover up at front. 4. Pull cover forward and out.
To replace the cover: 1. Fit notches and clips on underside of cover over rear
and center cross bars on shelf. 2. Lower cover into place. 3. Pull cover forward to secure rear clips onto shelf. 4. Replace meat drawer.
Removing
2. Lift the front.
the crisper(s)
and crisper
then the back.
cover
To remove the crisper(s): 1. Slide crisper(s) straight out to the stop.
3. Slide out the rest of the way. 4. Replace in reverse order.
To remove the cover: 1. Lift cover front and remove the cover support.
2. Lift cover up and slide out.
To replace the cover: 1. Fit cover tabs into lowest cabinet slots and push in.
Lower the front retainers into place. 2. Insert cover support (with the long tab toward the front) into the groove on the underside of the cover. NOTE: If the support needs adjustment, turn base clockwise to raise or counterclockwise to lower.
8
|
|
|
> |
|