|
|
|
Categories
|
|
Information
|
|
Featured Product
|
|
|
 |
|
|
There are currently no product reviews.
 ;
This manual is immaculate in it's accuracy. Everything is written very clearly and easy to understand. Written by a professional who wants to convey a clear and easy to understand message!!
;
This Manual (as downloaded) is both informative and comprehensive and has proved to be extremely useful. thoroughly recommended.
;
everything is ok, thank you very much! Product is good, no problems with download!
;
Great site, I always find all the manuals I need and i can't find anywhere else. PDF for the Sony PCM 3348 is complete and scan is good quality. Thank you!
;
It was a complete manual as stated. Very good source for older product manuals. Thanks
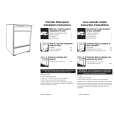
Removing the meat pan and cover.. .
The meat pan and cover can be removed for cleaning and moved to another shelf, if desired. Remove the meat ban first.
Removing:
1. Slide meat pan out to stop. 2. Lift the front of meat pan. 3. Slide pan the rest of the wav out. 4. To remove cover, push up glass insert from bottom, then lift out with both hands. 5. Lift cover frame straight up and out.
Replaclng:
1. To replace cover, fit notches in cover frame sides over center shelf support. 2. Lower cover frame into place. 3. Lower glass insert into cover frame. 4. To replace pan, fit edges of pan into supports on cover 5. Slide meat pan into place.
rvifwi
z&x
the light bulb...
find bulb. bulb.
~L+mxI�.L..Ip
WARNING: Betore removing the light bulb, either unplug the retrlgerator or disconnect the electricity leading to the retrlgemtor at the maln power supply. Shock and Injury can occur If electrlclty remains connected.
2. Remove bulb. 3. Replace with a 40-watt appliance ~*%,~~*~~aFma%%*l. ~**i--,)WL~hX-~,*rUi*~~~~
Removing crispers and crisper cover.. .
ull Out to Stop. Lift the Front
Removlng the Crispers:
1. Slide crisper straight out to stop, lift front, then slide the rest of the way out. 2. Replace in the reverse order
Removlng Cover:
I, Push up glass insert from bottom, then slide out with both hands. 2. Lift front of cover frame and remove cover support. 3. Lift out cover frame by pulling up and out.
Replacing
Lift the Frame Front, then the Back.
Cover:
Glass Is heavy. Be Caretul.
A* I. 2. 3. 4. j -�~.u�rcL , A& .I -�IBe&
I. Fit back of cover into notch supports on walls of refrigerator, then lower front into place. 2. Replace cover support with the long tab towards the front. Note: If the support needs adjustment, turn base right to lower, or left to raise. 3. Slide back of glass insert into place, then lower front &w&5* DZYLI -A.?. i..i,P-iP
Adjusting
the refrigerator
shelves...
First, remove food from shelf. Slide shelf straight out to stop. Lift front. Slide the rest of the way out.
Replaclng
Shelf:
1, Fit back of shelf on top of guides with wire stops on the bottom of guides. 2. Lift front, slide shelf in until it clears guide stops,
1. Lift front slightly. 2. Lift back off supports. 3. Replace in reverse order. Litt the Front Then the Bat
|
|
|
> |
|