|
|
|
Categories
|
|
Information
|
|
Featured Product
|
|
|
 |
|
|
There are currently no product reviews.
 ;
Speedy confirmation to my order , with elaborate instructions .
Item Email , received immediately as desired by me.
A Pleasant & Satisfying Transaction.
;
I was searching for this manual at last i got it from this web
;
What can i say but i would have been lost without your support.
Thank You!
;
Très satisfait ! envoi rapide, Grand catalogue disponible. Many thanks !
;
Delivery came quite promptly and in a very readable format. Thank you.
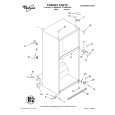
Charnière supérieure
1 2 3 4
s s
Inversion des poignées de porte
Enlever le montage de la poignée du congélateur comme illustré. Garder toutes les pièces ensemble. Enlever le montage de la poignée du réfrigérateur comme illustré. Garder toutes les pièces ensemble.
Pour réinstaller la poignée du congélateur :
1. Couvercle 2. Vis à tête hexagonale pour charnière 3. Charnière supérieure 4. Vis de fixation
1. Positionner la poignée du congélateur sur la porte du congélateur. 2. Installer les 2 vis supérieures. 3. Installer les 2 vis inférieures. 4. Serrer toutes les vis. Pour réinstaller la poignée du réfrigérateur : 1. Enlever le bouchon du trou de la porte du réfrigérateur et le visser en place au côté opposé.
Charnière centrale
1 2 3 4 5
2. Positionner la poignée du réfrigérateur sur la porte du réfrigérateur et installer les 2 vis au sommet. 3. Aligner la partie inférieure de la poignée et installer la vis de la poignée. 4. (Style 1) Positionner le couvercel des vis et appuyer pour l�enclencher en place. 5. (Style 2) Aligner le bord supérieur de la garniture avec les encoches à la partie inférieure de la poignée et glisser vers le haut en position.
1. Butée de porte 2. Vis d�arrêt de porte 3. Cheville de charnière 4. Vis à tête hexagonale pour charnière 5. Vis de fixation
Charnière inférieure
1 2 3 4
1. Butée de porte 2. Vis d�arrêt de porte 3. Cheville de charnière 4. Vis à tête hexagonale pour charnière
29
|
|
|
> |
|