|
|
|
Categories
|
|
Information
|
|
Featured Product
|
|
|
 |
|
|
There are currently no product reviews.
 ;
It answered my question, which was how to load the paper. I did notice that the very end of the manual was not visible.
 ;
The product manual I received was exactly what I was looking for, delivered painlessly at a very fair price. I can't ask for any more than that.
;
Very well done!!!!! congratulations. It was a bit longer than usual the wiating time even if it was on time (in 24 hours).
;
Last week I bought a second hand BAUKNECHT TRK4850 DRYER. It is a professional machine with many programs and switch options. I feared it would be a huge quest to find a manual. I was delighted when I found owner-manuals.com. After payment I received the file to download the next day already. The quality is great. I am very happy. Thanks!
but kindly the distributions of the operating programs not find in the owners manual,can you help me to understand the operating programs instructions thank you
;
Very good copy, very readable and easy transaction as always.
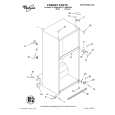
Charnière supérieure
1 2 3 4
s s
Inversion des poignées de porte
Enlever le montage de la poignée du congélateur comme illustré. Garder toutes les pièces ensemble. Enlever le montage de la poignée du réfrigérateur comme illustré. Garder toutes les pièces ensemble.
Pour réinstaller la poignée du congélateur :
1. Couvercle 2. Vis à tête hexagonale pour charnière 3. Charnière supérieure 4. Vis de fixation
1. Positionner la poignée du congélateur sur la porte du congélateur. 2. Installer les 2 vis supérieures. 3. Installer les 2 vis inférieures. 4. Serrer toutes les vis. Pour réinstaller la poignée du réfrigérateur : 1. Enlever le bouchon du trou de la porte du réfrigérateur et le visser en place au côté opposé.
Charnière centrale
1 2 3 4 5
2. Positionner la poignée du réfrigérateur sur la porte du réfrigérateur et installer les 2 vis au sommet. 3. Aligner la partie inférieure de la poignée et installer la vis de la poignée. 4. (Style 1) Positionner le couvercel des vis et appuyer pour l�enclencher en place. 5. (Style 2) Aligner le bord supérieur de la garniture avec les encoches à la partie inférieure de la poignée et glisser vers le haut en position.
1. Butée de porte 2. Vis d�arrêt de porte 3. Cheville de charnière 4. Vis à tête hexagonale pour charnière 5. Vis de fixation
Charnière inférieure
1 2 3 4
1. Butée de porte 2. Vis d�arrêt de porte 3. Cheville de charnière 4. Vis à tête hexagonale pour charnière
29
|
|
|
> |
|