|
|
|
Categories
|
|
Information
|
|
Featured Product
|
|
|
 |
|
|
There are currently no product reviews.
 ;
Great manual, great price. I am very pleased with Owner-Manuals.com, quick service, fast communication. Will definitely use this site again.
;
Hello from Germany - thank you very much for the manual for my Sharp "Searcher" - the handling of your internet area is outstanding..Mike
;
I am very happy with the owner's manual. I bought a used Casio and was so relieved that I was able to get a hold of a owner's manual. It was very easy to download the manual and I had no problems with printing it. Thank you! Nancy Whalen
;
The purchased manual is an high-quality scan of the original JVC paper-based Owner´s Manual. I am very satisfied!
;
Very satisfied with received document, all is right, Thank You very much, it was a Pleasure to work with You.
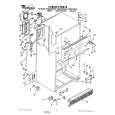
Removing
the crispers
and crisper
cover
I//k
Pull out to the stop, lift the front
To remove the crispers: 1. Slide crisper straight out to the stop, lift front, then slide the rest of the way out. 2. Replace in reverse order. To remove the cover: 1. Push up glass insert from bottom, then slide out with both hands. 2. Lift front of cover frame. 3. Lift out cover frame by pulling up and out. 4. Remove metal cover support. To replace the cover: 1. Replace metal cover support on wall supports in front section of cabinet. 2. Fit back of corner into notch supports on walls of refrigerator, then lower into place. 3. Slide back of glass insert into place, then lower front.
Remove the glass insert, lift the frame front,
then the back.
Adjusting the crisper humidity control You can control the amount of humidity in the moisture-sealed crisper. 1. The control can be adjusted to any setting between LOW and HIGH. 2. LOW (open) lets moist air out of crisper for best storage of fruits and vegetables with skins. 3. HIGH (closed) keeps moist air in the crisper for best storage of fresh leafy vegetables.
Moving Pull out to the stop, lift the front and pull again. hl 1. 2. 3. 4.
the meat drawer
and cover
To remove
the meat drawer:
Slide the meat drawer out to the stop. Lift the front. Slide the drawer the rest of the way out. Replace in reverse order.
To remove the cover: 1. Tilt front of cover up, lift at back, and pull straight out. 2. Replace in reverse order.
7
|
|
|
> |
|