|
|
|
Categories
|
|
Information
|
|
Featured Product
|
|
|
 |
|
|
There are currently no product reviews.
 ;
I'm so glad I was able to find a site to download my missing manuals. Very reasonable prices and they kept me informed about the process and I had my manual within less than a day. The only thing I wish was an option is a 100% English version with no spanish or anything. But overall great site.
;
The manual is complete with excellent quality! One suggestion, show number of pages and weather it is multi-lingual. The AD 600 Manuel is about 76 pages and over half is non English. This results in a larger print job than usually needed. Having this information, one could select the desired pages for printing.
 ;
I've been looking for a copy of the original user/owner manual. Just what the doctor ordered, thank you.
;
the manual was very helpful thank you very much no one else was able to help me thanx
;
This is an excellent handbook. We had no information on the appliance until we obtained this and are now able to use the appliance to its full potential. Strongly recommended.
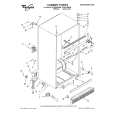
Installing
it properly
1. Allow 1/2inch (1.25 cm) space on each
side and at the top of the refrigerator for ease of installation. 2. If the hinge side of the refrigerator is to be against a wall, you might want to leave extra space so the door can be opened wider. 3. The refrigerator can be flush against the back wall.
Leveling
it
Right to raise;
Your refrigerator has 2 front leveling screws-one on the right and one on the left. To adjust one or both of these, follow the directions below. 1. Remove base grille. (See page 12.) 2. To raise front, turn screw clockwise. 3. To lower front, turn screw counterclockwise. 4. Check with level. 5. Replace base grille. (See page 12.)
left to lower
screwdriver
6
|
|
|
> |
|