|
There are currently no product reviews.
 ;
This manual is immaculate in it's accuracy. Everything is written very clearly and easy to understand. Written by a professional who wants to convey a clear and easy to understand message!!
;
This Manual (as downloaded) is both informative and comprehensive and has proved to be extremely useful. thoroughly recommended.
;
everything is ok, thank you very much! Product is good, no problems with download!
;
Great site, I always find all the manuals I need and i can't find anywhere else. PDF for the Sony PCM 3348 is complete and scan is good quality. Thank you!
;
It was a complete manual as stated. Very good source for older product manuals. Thanks
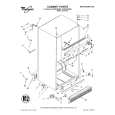
Removing
the meat drawer
and cover
To remove the meat drawer: 1. Slide meat drawer out to the stop. 2. Lll front of meat drawer. 3. Slide meat drawer out the rest of the way. 4. Replace in reverse order. To remove the cover: 1. lilt front of cover up. 2. Lii hack of cover. 3. Pull cover straight out. 4. Replace cover in reverse order.
Pull out to the stop,
lift the front and pull agaln.
Removing
the crispers
and crisper
cover
Pull out to the
To remove the crispers: 1. Slide the crisper straight out to the stop. 2. Lii the front. 3. Slide out the rest of the way. 4. Replace in reverse order.
top, lift the front and pull again.
To remove the cover: 1. Push up glass insert from the bottom, then slide it out with both hands. 2. Lii front of cover frame. 3. Pull cover frame up and out. 4. Remove metal cover support. To replace the cover: 1. Replace metal cover support on wall supports in front section of cabinet. 2. Ffi hack comers of cover frame into notch supports on walls of refrigerator, then lower front onto metal cover support. 3. Slide hack of glass insert into cover frame. Then lower front to level position.
Remove the glass insert front of Lift
cover frame, then the back
12
|