|
|
|
Categories
|
|
Information
|
|
Featured Product
|
|
|
 |
|
|
There are currently no product reviews.
 ;
Very well done!!!!! congratulations. It was a bit longer than usual the wiating time even if it was on time (in 24 hours).
;
Last week I bought a second hand BAUKNECHT TRK4850 DRYER. It is a professional machine with many programs and switch options. I feared it would be a huge quest to find a manual. I was delighted when I found owner-manuals.com. After payment I received the file to download the next day already. The quality is great. I am very happy. Thanks!
but kindly the distributions of the operating programs not find in the owners manual,can you help me to understand the operating programs instructions thank you
;
Very good copy, very readable and easy transaction as always.
;
It is perfect, exactly what we needed. It's like the paper version but less clutter.
 ;
Received my manual within 24 hours. Very clear scan of the manual I needed. Thanks!
4de61451.fm5 Page 11 Tuesday, September 18, 2001 2:38 PM
Elektrischer Anschluss
Bevor die Kochmulde an das Stromnetz angeschlossen wird: Die Kochmulde muss von einem Fachmann installiert werden, der mit allen gängigen Sicherheits- und Montagevorschriften vertraut ist. Stellen sie sicher, dass die auf dem Typenschild angegebene Spannung zum Stromnetz Ihres Hauses passt. Nach den Vorschriften muss die Kochmulde geerdet sein; daher müssen alle Leitungen und Anschlüsse entsprechend dimensioniert sein. Stellen Sie sicher, dass die Kochmulde korrekt geerdet ist. Der Hersteller übernimmt keinerlei Haftung für Schäden am Gerät oder Verletzungen von Personen oder Haustieren, wenn die oben genannten Vorschriften nicht eingehalten werden. Verwenden Sie für den elektrischen Anschluss ein Kabel vom Typ HO5RR-F entsprechend der folgenden Tabelle:
Spannung Litzen (Anzahl und Abmessungen)
230 V 230 V 3 400 V 2N 400 V 3N
3 X 2,5 mm2 min. 4 X 2,5 mm2 min. 4 X 2,5 mm2 min. 5 X 1,5 mm2 min.
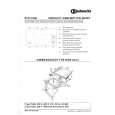
Achtung: Das Stromkabel muss lang genug sein, dass die Kochmulde bequem aus der Arbeitsplatte entfernt werden kann und so verlegt werden, dass es nicht durch Kontakt mit dem Muldenboden erhitzt oder beschädigt wird. Klemmenanschlüsse Anmerkung: Das Erdkabel (gelb/grün) muss an die Symbolklemme angeschlossen werden und länger als die anderen Litzen sein. � Entfernen Sie etwa 70 mm der Ummantelung des Stromkabels (B) � Entfernen Sie etwa 20 mm der Ummantelung der einzelnen Litzen. Führen sie das Kabel (max. Durchmesser 14 mm) zuerst durch die Halteklemme und schlie�en dann die einzelnen Litzen entsprechend dem auf dem Geräteboden aufgedruckten Diagramm an. � Fixieren Sie das Stromkabel (B) mit der Halteklemme. � Setzen sie den Deckel (A) auf und schrauben ihn fest. Nach dem ersten Einschalten und bei jedem Ein-/ Ausschalten wird kurz ein Symbol (z.B. E-00, E-01, E-02) angezeigt.
Die Kochmulde muss mit einem Unterbrecherschalter für alle Pole ausgerüstet sein, der die Leitungen mindestens 3 mm voneinander trennen kann.
11
|
|
|
> |
|