|
|
|
Categories
|
|
Information
|
|
Featured Product
|
|
|
 |
|
|
There are currently no product reviews.
 ;
Great service. Manual is as advertised and delivered when promised.
;
Perfect quality, highly appreciated service !!!
Fast delivery of the download info, no issues at all. Recommended E-manual shop !!!
;
hi owners manual- crew,
i am very satisfied about the trade with you.
if i need some other manuals, i will contact you again.
thanks
frank kappler
;
Full Panasonic service Manual, as described, no problems
;
This place is amazing. Got our manual in a few hours. Print quality is excellent. Even the manufacturer didn't have this manual. The price was excellent. How many more stars can I give them? More than satisfied.
Install
properly...
Remove sales labels...
Remove the Consumer Buy Guide label and any
lnslde labels before using the freezer To remove any remalnlng glue:
1. Rub briskly remove with thumb to make a ball, then
OR
2. Soak area with dishwashing detergent solution (1 teaspoon detergent in 1 quart warm water] before removing glue as described in step 1
DO NOT USE rubbing alcohol or flammable or toxic solvents, such as acetone, gasoline, carbon tetrachloride, etc. These can damage the material. NOTE: DO NOT REMOVE the Tech Sheet fastened under the freezer at the front.
Clean it ...
I, Check weight the strength of the floor. It should hold the of a fully loaded freezer Clean your freezer befor using it. See cleaning tnstructions on page 6.
2. Pick a safe place, indoors, away flammables such as gasoline.
from in-
3 Allow 3 inches (7 5 cm] arr space on top of freezer for proper ventrlation. 4. Allow at least an inch (2.5 cm) between the freezer condenser, on the back of the unit, and the wall 5 Allow % inch (1 25 cm) on each srde of the freezer for ease of installation. 6. If the freezer is to be against a wall, you mrght want to leave extra space on the hinge side so the door can be opened wider.
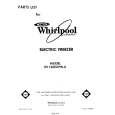
Plug it in...
j-prong grounding type wall receptacle Retaining Clip
Level freezer...
so the door will stay open at any position.
Raise
lower
Freezer 1 Power Plug Recommended
I grounding-plug Grounding Method
Start ad)ustment
with the door hinge side.
I, Slide the freezer into place. 2. Adjust front legs to level the freezer. -To raise front, turn legs clockwise. -To lower front, turn legs counterclockwise. 3. Check with level. 4. After freezer is fully loaded, recheck with level
A 115 Volt, 60 Hz., AC only 15 or 20 ampere fused and properly grounded electrical supply is required. It is recommended that a separate circuit serving only this appliance be provided. Use a receptacle
which cannot be turned off with a switch or pull chain. Do not use an extenslon cord.
Attach retaining literature package clip over power cord plug from inside the freezer.
|
|
|
> |
|