|
|
|
Categories
|
|
Information
|
|
Featured Product
|
|
|
 |
|
|
There are currently no product reviews.
 ;
I AM HIGHLY IMPRESSED BY THE EASE OF USE OF THIS DOWNLOAD SERVICE. INSTRUCTIONS ARE CLEAR AND SIMPLE TO FOLLOW....EVEN BY TECHNOPHOBES SUCH AS MYSELF. THE EMAILS POINT YOU IN THE RIGHT DIRECTION...ITS SO EASY PEASY. THE DOWNLOAD CHOICE OF USER MANUALS IS EXTENSIVE AND I COULD NOT FIND A CHEAPER OR MORE EFFICIENT SERVICE ON THE INTERNET. I COULD NOT HAVE MADE A BETTER CHOICE OF INFORMATION PROVIDER. SHOULD I EVER NEED ANOTHER USER MANUAL, THEN THIS IS THE FIRST CHOICE SITE. COULD NOT BE BETTER PLEASED!!!!!!!...MANY THANXES FROM JIM BURNS
;
I was impressed with the quality of service (frequent e-mails to let you know the status of your order), and the speed at which the download became available. The manual was a life saver and was not easy to track down. Thank you for such an excellent service.
;
the manual was just what i wanted it had all the revelent information required to operate the hifi .Iwould use any manual i downloaded for any item which needs a manual
;
Die gewünschte Bedienungsanleitung wurde vereinbarungsgemäß in deutsch bereitgestellt. Sie ist gut lesbar. Kein Kauderwelsch.
Danke für den Service.
;
GOOD SERVICE MANUAL GOT ALL THE INFO. THAT I NEEDED..
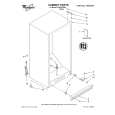
INS TAL LI NG Y O UR F R EE Z ER
Choosing the proper location
Read the following items before choosing the location for the freezer. See �Completing the installation� below before sliding freezer into place. 1. Pick a safe place, indoors, away from flammables such as gasoline. 2. Check the strength of the floor. It should hold the weight of a fully loaded freezer. 3. Allow at least 3 inches (7.5 cm) of air space at top and both sides of freezer. 4. Allow at least 1 inch (2.5 cm) of air space between the back of the freezer and the wall. 5. If the freezer is to be against a wall, you might want to leave extra space on the hinge side so the door can be opened wider. 3 inches min.
±
3 inches min.
±
Completing the installation
Level freezer so the door will stay open at any position. 1. Locate, remove and discard the 4 bolts that held the freezer in the shipping crate. 2. Locate the 2 front leveling legs taped among the packing materials. 3. Screw these legs into the front holes on the bottom of the freezer. The back of the freezer rests on 2 fixed supports. 4. Adjust the 2 front legs so freezer does not rock. 5. Connect freezer to proper electrical supply and attach retaining clip. (Refer to �Locating the proper electrical supply� on page 5.) 6. Slide freezer into place. 7. Place a level on top of the freezer�first side to side then front to back. Turn leg counterclockwise to raise a corner. Turn leg clockwise to lower a corner. 8. Repeat Step 7 until the freezer is level. 9. After freezer is fully loaded, recheck with level.
Lower
±
Raise
6
± ±
± ±
± ±
|
|
|
> |
|