|
|
|
Categories
|
|
Information
|
|
Featured Product
|
|
|
 |
|
|
There are currently no product reviews.
 ;
The product manual I received was exactly what I was looking for, delivered painlessly at a very fair price. I can't ask for any more than that.
;
Very well done!!!!! congratulations. It was a bit longer than usual the wiating time even if it was on time (in 24 hours).
;
Last week I bought a second hand BAUKNECHT TRK4850 DRYER. It is a professional machine with many programs and switch options. I feared it would be a huge quest to find a manual. I was delighted when I found owner-manuals.com. After payment I received the file to download the next day already. The quality is great. I am very happy. Thanks!
but kindly the distributions of the operating programs not find in the owners manual,can you help me to understand the operating programs instructions thank you
;
Very good copy, very readable and easy transaction as always.
;
It is perfect, exactly what we needed. It's like the paper version but less clutter.
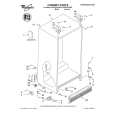
The Key Eject lock...
can help entrapment. reduce the hazard of child
Changing
Light Bulb...
cord. by pulling away from the
I. Unpli rg power
2. Rem )ve light shield side vail.
To lock or unlock the freezer you must hold the key in the lock while turning. The lock is spring loaded so the key cannot be left in the lock. If the key is lost, contact your WHIRLPOOL dealer for a replacement. Always give the complete model and serial number requesting a replacement of your freezer key. when
/�
Pull out
3. Repl ice bulb with 40 watt appliance 4. To reiolace and xess.
l l
bulb.
shield,
insert tabs into slots in Wall
Removing
l l
the Base Grille...
showing through grille.
Swing
the top
of the grille
forward.
Open the door. Lift up on two tabs
Lift up the grille-holding
Lift gri le off bottom
supports.
Swing out; lift up
tabs
l l
Replc ce in reverse order. Do nc t remove Tech Sheet fastened the g Ile.
behind
Optional
Ice Maker...
The automatic ice maker can be added to your freezer as an optional accessory. See your dealer to order Part No. ECKMF-6 To start:
l
To stop: l Raise ;ignal arm until it locks in up position. l If bin i removed from freezer, place signal arm in OFF position. When ::)in is replaced, push it all the way in and lower :irm to ON position.
Push signal
arm down.
-.
OFF/ON: Signal Arm
8 After freezer has cooled several hours, the ice maker will begin automatically making ice cubes until the bin is full. Then it turns off. l As ice cubes are removed from the bin, the ice maker will replace them automatically. 4
TIPS: l ShaIce the bin occasionally to keep cubes sep Irate. It�s normal for cubes to freeze, in a g oup. they break apart easily. l You will hear sounds as the water fills the mol :ts and ice falls into the bin. This is nor1 7al l Bet ause of new plumbing connections, the irst few cubes may be discolored or hav :?an off-flavor. Throw these away. l If c ;bes are not used for a number of wet <s they will become smaller and develc p an off-flavor. The circulating air in the reezer starts a slow evaporation of the cut es. The longer they are stored, the mol t? noticeable is the evaporation. Discar i these cubes.
|
|
|
> |
|