|
|
|
Categories
|
|
Information
|
|
Featured Product
|
|
|
 |
|
|
There are currently no product reviews.
 ;
The manual was complete and of great quality. Originally a tri-lingual file, I first received only one language. After a note to owners-manuals.com, I quickly received the remaining languages... Great service, definitely worth it.
;
Thank you for providing this manual and at low cost.
The Philips scope is of excellent quality, longevity and build and had a couple of faults
when it was passed to me. Having the CCT diagrams is a blessing.
I have fixed the problems and also modded the scope to my requirements.
I have built a 24v Li-Ion pack for portable use from old but good laptop batts.
it is working beautifully and I am well pleased. Keep up the good work Guys.
 ;
manual was very helpful in learning how to propery use my washer. I could not find this manual anywhere else.
;
Awesome quality manual. You really saved my bacon with this one. Was looking for some specific information with regards to my "new" vintage VCR that didn't come with the owners manual. This site is truely a goldmine of available manuals. The quality of the scans are top notch.
Thank-you so much for this awesome manual. If you're looking for this Sony SL-HF400 owners manual, this is the one you NEED to buy. Definitely worth the money.
;
The manual was made available promptly. I is a clean scan of the original. I had no problem downloading it. The scan was well centered and cleanly formatted. It is as good a product as can be had without being the original document.
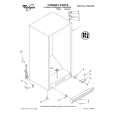
INS TAL LI NG Y O UR F R EE Z ER
Choosing the proper location
Read the following items before choosing the location for the freezer. See �Completing the installation� below before sliding freezer into place. 1. Pick a safe place, indoors, away from flammables such as gasoline. 2. Check the strength of the floor. It should hold the weight of a fully loaded freezer. 3. Allow at least 3 inches (7.5 cm) of air space at top and both sides of freezer. 4. Allow at least 1 inch (2.5 cm) of air space between the back of the freezer and the wall. 5. If the freezer is to be against a wall, you might want to leave extra space on the hinge side so the door can be opened wider. 3 inches min.
±
3 inches min.
±
Completing the installation
Level freezer so the door will stay open at any position. 1. Locate, remove and discard the 4 bolts that held the freezer in the shipping crate. 2. Locate the 2 front leveling legs taped among the packing materials. 3. Screw these legs into the front holes on the bottom of the freezer. The back of the freezer rests on 2 fixed supports. 4. Adjust the 2 front legs so freezer does not rock. 5. Connect freezer to proper electrical supply and attach retaining clip. (Refer to �Locating the proper electrical supply� on page 5.) 6. Slide freezer into place. 7. Place a level on top of the freezer�first side to side then front to back. Turn leg counterclockwise to raise a corner. Turn leg clockwise to lower a corner. 8. Repeat Step 7 until the freezer is level. 9. After freezer is fully loaded, recheck with level.
Lower
±
Raise
6
± ±
± ±
± ±
|
|
|
> |
|