|
|
|
Categories
|
|
Information
|
|
Featured Product
|
|
|
 |
|
|
There are currently no product reviews.
 ;
It was complete service manual with all needed service informations. Thanks.
 ;
El manual esta muy detallado, los numeros de partes y los esquemas de despiece son correctísimos y muy claros, tanto para los técnicos experimentados como para los novatos.
;
Ottima qualità grafica e completo nelle notizie. Costo abbastanza contenuto.
;
Great and quick support. The maual was exactly what I was looking for and my problem
solved. Many thanks.
;
Very good service Within one day i received a pdf of the users manual and electric circuits so I was able to measure the different voltages in the printed circuit and find out the fault Payment was also reliable and easy.Without the manual i could not have repaired.So thanks to "Search for a manual"
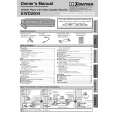
Preset for Use
Turn on the unit for the first time
VCR
To Preset the Channel Again
1) Press the MENU button until the main menu appears. 2) Select "CHANNEL SET UP" by pressing the K or L button. Then, press the B button. 3) Select "AUTO SET UP" by pressing the K or L button. Then, press the B button. After scanning, the tuner stops on the lowest memorized channel.
4
or
CLOCK SET MONTH DAY 03 / 15 HOUR MINUTE �� : �� YEAR 2004 AM/PM ��
VCR
1
Turn on the TV and set it to channel 3.
� If channel 3 is already occupied for broadcasting, see�RF Output Channel� section.
Select the current year
To Change the On-Screen Language
1) Press the MENU button until the main menu appears. 2) Select "LANGUAGE SELECT" by pressing the K or L button. Then, press the B
LANGUAGE SELECT B ENGLISH or FRANCAIS ESPA�OL [ON]
5
or
CLOCK SET MONTH DAY YEAR 0 3 / 1 5 MON 2 0 0 4 HOUR MINUTE 05 : �� AM/PM ��
2
POWER
Remote Control
TV Screen
button. 3) Select "ENGLISH" , "FRANCAIS" or "ESPA�OL" by pressing the K or L button. Then, press the CLEAR/C.RESET button.
Select the current hour
Setup
3
YES
Hint
CH 01
6
or
� If you accidentally select Spanish or French and need English: Press the MENU button and choose SELEC. IDIOMA, or SELECTION LANGUE. Press the B button, and select ENGLISH. Finally, press the CLEAR/C.RESET button.
CLOCK SET MONTH DAY YEAR 0 3 / 1 5 MON 2 0 0 4 HOUR MINUTE 05 : 40 AM/PM ��
AUTO SET UP
Clock Set Up
VCR
Select the current minute
VCR
Do you connect the cable from the cable box or the satellite box to the DVD/VCR�s ANT IN jack?
1
MENU
Yes Press the MENU
button to exit
� Refer to �Hint for Cable Box or Satellite Box� section on page 6.
or
TIMER PROGRAMMING AUTO REPEAT [OFF] CHANNEL SET UP B CLOCK SET LANGUAGE SELECT
-MENU-
7
or
CLOCK SET MONTH DAY YEAR 0 3 / 1 5 MON 2 0 0 4 HOUR MINUTE 05 : 40 AM/PM P M AM B PM
NO
Please wait for a few minutes. After scanning...
� The tuner stops on the lowest memorized channel. � You can select only the channels memorized in this unit by using the CHANNEL buttons. � If "AUTO SET UP" appears on the TV screen again, check the cable connections. Then press the B button once again.
No No
� If the clock is not set, the CLOCK SET screen appears when you press the MENU button. In this case, go to step [2].
Select �AM� or �PM�
8 2
or CLOCK SET MONTH DAY 03 / �� HOUR MINUTE �� : �� YEAR ���� AM/PM ��
To exit the CLOCK SET screen.
Hint
� Repeat these steps only if either there was a power failure or this unit has been unplugged for more than 30 seconds. Select the current month
Hint
� To go back one step, press the s button (during the steps [2] to [7].) � Your clock setting will be lost if either there is a power failure or this unit has been unplugged for more than 30 seconds.
To Select a Channel
You can select a channel by directly entering channel using the Number buttons on the remote control. Notes for using the Number buttons: � When selecting cable channels which are higher than 99, enter channel numbers as a three-digit number. (For example: 117, press 1,1,7) � You must precede single-digit channel numbers with a zero (For example: 02, 03, 04 and so on).
3
or
CLOCK SET MONTH DAY 03 / 15 HOUR MINUTE �� : �� YEAR ���� AM/PM ��
Select the current day
� 10 �
EN
|
|
|
> |
|