This is one of four manuals I have downloaded recently.
Purchase was very straight forward and the authorising email arrived in about 4 hours.
The quality of the scan is good. Print is clear and square to the page edges.
Exactly as advertized. High quality digital copy of the Nak 610 user manual. Easy download and access. Highly recommended.
Text excerpt from page 7 (click to view)
CLEANING AND MAINTENANCE
Make sure that the machine is unplugged and the water tap turned off before undertaking any kind of maintenance.
Bodywork
The outside or the machine can be cleaned with warm water and a neutral non-abrasive household detergent. Wipe with clean water and dry after cleaning. Important : do not use methylated spirit, diluents or similar products. It is advisable, from time to time, to carry out a complete cycle without a washing load, adding a decalcifying product.
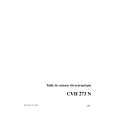
The detergent dispenser
The detergent dispenser is very easy to remove. Exert a pressure on the brooches located on each side of the detergent dispenser and pull it up (fig. 1 and 2). Clean the detergent dispenser under running water with a brush or a piece of rag (fig. 3). Check that the siphons located at the back of the detergent dispenser are not obstructed (fig. 4). Replace the detergent dispenser in the notches until the hanging (fig. 5).
fig.3 fig.4
fig.1
fig.2
The drain filter
The machine has got a mecanic filter located on the front part to collect lint and small objects (toothpins, coins, pins, etc.) inadvertently left in the clothes. It is essential that the filter is cleaned regularly. Frequency of cleaning depends on the type of articles washed (cleaning should be more frequent if the articles have no hem and tend to fray). - Open the flapdoor (fig. 6). - To drain the residual water : Place below a container not very high up with straight edges. To complete the draining, turn the cap of the drain filter until its vertical position and the residual water will be released (fig. 7). - To clean the filter : Turn the filter anticlockwise and get it away (fig. 8). Clean it with current water. Replace the filter and screw down it clockwise. Then, close the flapdoor.
fig.8 fig.5