|
|
|
Categories
|
|
Information
|
|
Featured Product
|
|
|
 |
|
|
There are currently no product reviews.
 ;
Good quality, all schematics of few of models. There is also short form of user manual and regulation manual.
;
Perfect copy of the service manual. you can enlarge every page, and it comes up
with all details.
;
It´s very very nice manual with all, what i need. Original in good quality. Very fast business. Very much thanks...
;
Purchased the manual that I was looking for at a great price and could download it easily.. Great service experience and for future purchases I plan to use the site.
Thank you very much
;
Exactly what was needed to assess the product - excellent value and great service
July 6th, 1998
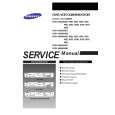
INSTALLING OPTIONAL UNITS
3.3.6 PAPER FEED UNIT (SIDE FLOW)
Installation Procedure 1. Put the machine on the paper feed unit [A], and remove the connector cover [B] (1 screw). 2. Secure the machine and the paper feed unit at the front side with the panel screw [C], spacer [D], and the collar [E]. NOTE: This step is not required for the H515 models. 3. Secure the rear side with the bracket [F] (2 screws). Then connect the harness [G] to the machine. 4. Install the harness cover [H] (1 screw), and replace the connector cover [B] (which was removed in step 1). 5. Load the paper and turn on the machine. Make a test print using the paper feed unit.
End of Procedure
[F] [E] [D] [C] [B]
Installation
[H] [G]
H110I501.WMF
3-13
|
|
|
> |
|