|
|
|
Categories
|
|
Information
|
|
Featured Product
|
|
|
 |
|
|
There are currently no product reviews.
 ;
5 star quality on these downloadable manuals. Easy to read and all the information is there. A must when doing a custom install or needing to service your precious old school electronics.
;
So usefull to make my installation a breeze. 5 stars on quality.
;
very helpful, the information in these manuels are very detailed
;
Please tell us what you think and share your opinions with others. Be sure to focus your comments on the product. You will receive $2.00 of store credit for Your review.
;
Please tell us what you think and share your opinions with others. Be sure to focus your comments on the product. You will receive $2.00 of store credit for Your review.
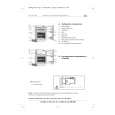
BASIC RECORDING
To stop recording, press the g button. When recording from a CD, press the s button again to stop playback. To pause recording, press the II button. (Applicable when recording from a radio broadcast or connected equipment.) To resume recording, press again.
9 II
INSERTING
CD TUNER/ BAND
BLANK SPACES
q REC
FUNCTION
Insertion of 4-second blank spaces may help you to locate the beginning of the track when the tape is played back on other equipment. (Applicable when the source is radio or connected equipment.) 1 Press the q REC/REC MUTE button on the remote control during recording or while in recording pause mode. �TAPE ~� flashes rapidly for 4 seconds and the tape runs without recording. After 4 seconds, the deck enters the recording pause mode. 2 Press the 1I button to resume recording.
t
,...-... �..... -� � Cassette deck \u $ c1 SHIFT I II
q
a
0
1
$
s
*I
TAPE
Q
Preparation
q q
q RECI REC MUTE
To insert a blank space of less than 4 seconds, press the q REC/REC MUTE button again while �TAPE ~� is flashing rapidly. To insert blank spaces of more than 4 seconds, after the deck enters recording pause mode, press the q REC/REC MUTE button again. Each time the button is pressed, a 4-second blank space is added.
Set the ta~e to the ~oint where recording will start. Use Type I (normal) and Type II (high/C rO-2)apes for recording. t
1 Load the tape to be recorded on into the deck.
Load the tape with the side to be recorded on first facing upward and the exposed side facing to the right. I r- 1
0
~
2 Press the TAPE button on the remote control to select the reverse mode.
To record on one side only, select Z. To record on both sides, select 1) or (=1. When recording is started from the side facing downward, the tape stops at the end of recording of this side, even if the reverse mode is set to =) or C=).
3 Press one of the function the source to be recorded.
buttons
and prepare
To record from a radio broadcast, press the TUNER/BAND button on the remote control and tune in to a station. To record from a CD, press the CD button on the remote control and load a CD. To record from equipment connected to the AUX IN jacks or the MD IN jacks, press the AUX/MD button repeatedly to display �AUX or �MD respectively, and prepare the equipment for playback.
4 Press the q REC button on the CD/tape start recording.
To
unit to
start recording with the remote control, press the q REC/ REC MUTE button and within 2 seconds, press the > button. When recording from a CD, playback and recording start simultaneously. When recording from connected equipment, start playback.
To erase a recording 1 Load the tape to be erased into the deck. 2 Set the tape to the point where the erasure is to be started. 3 Press the AUX/MD button on the remote control, or press repeatedly the FUNCTION button on the CD/tape unit so that �AUX is displayed. If an optional equipment is connected to the AU)( IN jacks, turn it off. 4 Press the q REC button on the CD/tape unit to start the erasure.
ENGLISH 15
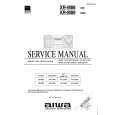 $4.99 FDLM88 AIWA
Service Manual Complete service manual in digital format (PDF File). Service manuals usually contains circuit diagr…
|
|
|
> |
|