|
|
|
Categories
|
|
Information
|
|
Featured Product
|
|
|
 |
|
|
There are currently no product reviews.
 ;
This GRUNDIG UV5A Owner Manual is not only an instruction manual but a total functional circuit description of the Multimeter and includes circuit diagram at the end pages. It is very helpful for repairing and calibrating the instrument. It is written in two languages English and German for international support. It was very easy to repair my unit with this document. Regards, Regis Pauly, Electrical Engineer.
;
The owner's manual was evetything I thought it would be. I was able to print it out using both sides of the paper in quick order, saving me a search online for a used one.
 ;
Хорошее качество сканирования.
Мануал пришел часов эдак через 12. В целом доволен.
;
Fantastic quality and impressive delivery time. Based on this manual, I recommend this service without hesitation! Five Stars for certain.
;
Was happy to find the complete owners manual... It's all in there, just like the original...
USING YOUR RANGE
USING THE MINUTE TIMER (MODELS FEP330E, FES330E, FES364E)
The Minute Timer does not start or stop the oven. It works like a kitchen timer. Set it in minutes up to an hour. You will hear a buzzer when the set time is up. NOTE: Do not push in the knob when setting the Minute Timer. Pushing in and turning the minute timer knob changes the clock setting.
1. Without pushing it in, turn the minute timer knob
counterclockwise until the timer hand passes the setting you want.
11 10 9 8
10 0
12
OFF 60
1 2
50
3 4
20 30
40
7
6
5
2. Without pushing it in, turn the knob back to the
setting you want.
11 10 9 8
10 0
12
OFF 60
1 2
50
When the time is up, a buzzer will sound. To stop the buzzer, turn the minute timer hand to OFF.
3 4
20 30
40
7
6
5
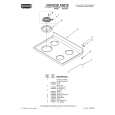
BAKING/ROASTING (MODELS FES330E AND FES364E)
1. Place the racks where you need them.
For more information, see �Positioning racks and pans� on page 13. Front of rack
Rear of rack
16
|
|
|
> |
|